{Milk Bar Monday} Apple Pie Cake Truffles

I think it’s pretty funny how non-committal we seem to be about desserts these days. The cupcake was one thing, (that’s a good 3 or 4 bites after all,) but for many grown ups (even me,) I sometimes just want a bite. One bite. You know- on those days when you have a horrible sweet tooth but a whole slice of cake feels like over-kill. There is even a cupcake shop in the city that sells teeny itty-bitty quarter sized cupcakes….for $1.00 each that’s a pretty amazing business idea huh?
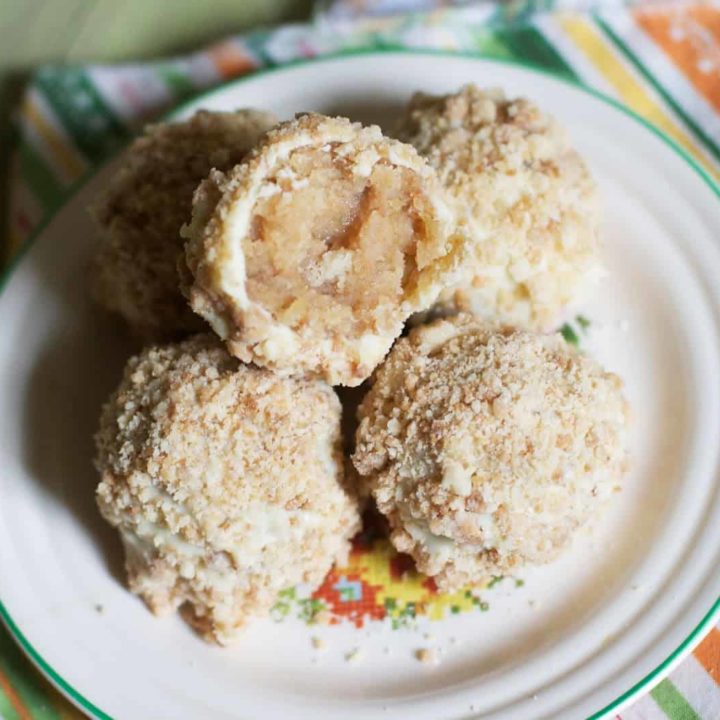
Anyway, back to the subject. Apple Pie Cake Truffles. All the flavor of Apple Pie in a bite sized little morsel. Funny maybe…but also 100% delicious. I know these pictures may not do them justice, but these really and truly taste like a bite of Apple-Pie heaven.

We start with a brown butter cake which provides a nice neutral backdrop for all the other flavors. After crumbling it up, (my favorite part,) A cinnamon-y apple cider soak and actual apple pie filling are added and combined together. Each truffle is coated in white chocolate and a healthy dose of buttery, salty pie crust crumb which adds the perfect finishing touch.
I’ve been adding a bundle of these to all my holiday gift boxes and I think they’re the perfect addition to a holiday cookie spread. I for one think that cookies hog all the attention this time of year, when really any bite-sized “no-fork-needed” dessert seems welcome on the dessert tray as far as I’m concerned. A little cellophane bag and twine bow are perfect for packing these up as cute as can be don’t you think?

Be sure to check out Erin’s version of these delicious truffles here. Also follow Milk Bar Monday on Twitter with hashtag #milkbarmondays. xoxo
{Milk Bar Monday} Apple Pie Cake Truffles
Ingredients
- 1 batch Barely Brown Butter Cake, recipe below
- 1 batch Apple Pie Filling, recipe below
- 1 batch Apple Cider Soak, recipe below
- 1 batch Pie Crumb, recipe below
- 8-12 oz. white chocolate- chopped, I ended up needing 12 oz to make these but you may need less depending on the thickness of your chocolate/coating.
Brown Butter Cake
- makes 1 Quarter Sheet Pan
- 40 g Brown Butter, 2 tablespoons
- 55 g Butter, 4 tablespoons, 1/2 stick
- 250 g Granulated Sugar, 1 1/4 cups
- 60 g Light Brown Sugar, 1/4 cup tightly packed
- 3 Eggs
- 110 g Buttermilk, 1/2 cup
- 65 g Grapeseed Oil, 1/3 cup
- 2 g Vanilla Extract, 1/2 teaspoon
- 185 g Cake Flour, 1 1/2 cups
- 4 g Baking Powder, 1 teaspoon
- 4 g Kosher Salt, 1 teaspoon
Apple Cider Soak
- makes 1/4 cup
- 55 g Apple Cider, 1/4 cup
- 5 g Light Brown Sugar, 1 teaspoon tightly packed
- 0.25 g Ground Cinnamon, pinch
Pie Crumb
- makes about 350 g, 2 3/4 cups
- 240 g Flour, 1 1/2 cups
- 18 g Sugar, 2 tablespoons
- 3 g Kosher Salt, 3/4 teaspoon
- 115 g Butter, melted (8 tablespoons, 1 stick)
- 20 g Water, 1 1/2 tablespoons
Apple Pie Filling
- makes about 400 g, 1 3/4 cups
- 1 Lemon
- 300 g Granny Smith Apples, 2 medium
- 14 g Butter, 1 tablespoon
- 150 g Light Brown Sugar, 2/3 cup tightly packed
- 1 g Ground Cinnamon, 1/2 teaspoon
- 1 g Kosher Salt, 1/4 teaspoon
Instructions
- To make truffles: Crumble the cooled cake in a large bowl. Add half of the Apple Pie Filling and half of the Apple Cider Soak. Use your hands to mush it all together. Add more of each if mixture feels too dry. (I used all of both because I wanted the maximum apple flavor in these.)
- Melt the white chocolate and put it in a shallow bowl. Using a spoon, dip each ball of cake into the white chocolate and tap it on the side of the bowl until all the drips are off. (Christina says to do this with gloved hands, but I didn't have gloves so I used this method instead.) Then toss it in the pie crumb until well coated. Put them in the fridge for at least 5 minutes to fully set the chocolate. The truffles can be stored in an airtight container for unto a week in the fridge.
For the Brown Butter Cake
- Heat the oven to 350 degrees F.
- To make the brown butter, place 2 tablespoons of butter in a microwave-safe bowl and top with a microwave-safe plate. Microwave for 3-5 minutes. The butter will pop while browning. Check the butter, and if not browned enough, microwave again in 1 minute increments. While the brown butter is cooling, stir periodically to incorporate the caramelized bits of butter. Cool completely.
- Combine the butters and sugars in the bowl of a stand mixer fitted with the paddle attachment and cream together on medium-high for 2 to 3 minutes. Scrape down the sides of the bowl, add the eggs, and mix on medium high for 2 to 3 minutes. Scrape down the sides of the bowl once more.
- Stream in the buttermilk, oil, and vanilla while the paddle swirls on low speed. Increase the speed to medium-high and paddle 5 to 6 minutes, until the mixture is practically white, twice the size of your original fluffy butter-and-sugar mixture, and completely homogenous. You’re basically forcing too much liquid into an already fatty mixture that doesn’t want to make room for it, so if it doesn’t look right after 6 minutes, keep mixing. Stop the mixer and scraped down the sides of the bowl.
- On very low speed, add the cake flour, baking powder, and salt. Mix for 45 to 60 seconds, just until your batter comes together and any remnants of dry ingredients have been incorporated. Scrape down the sides of the bowl. Mix on low speed for another 45 seconds to ensure that any little lumps of cake flour are incorporated.
- Pam-spray a quarter sheet pan and line it with parchment, or just line the pan with a Silpat. Using a spatula, spread the cake batter in an even layer in the pan. Bake for 30 to 35 minutes. The cake will rise and puff, doubling in size, but will remain slightly buttery and dense. At 30 minutes, gently poke the edge of the cake with your finger: the cake should bounce back slightly and the center should no longer be jiggly. Leave the cake in the oven for an extra 3 to 5 minutes if it doesn’t pass these tests.
- Take the cake out of the oven and cool on a wire rack, or, in a pinch, in the fridge or freezer. The cooled cake can be stored in the fridge, wrapped in plastic wrap, for up to 5 days.
For the Apple Cider Soak
- Whisk together all of the ingredients in a small bowl until the sugar is completely dissolved.
For the Pie Crumb
- Heat the oven to 350 degrees F
- Combine the flour, sugar, and salt in the bowl of a stand mixer fitted with the paddle attachment and paddle on low speed until well mixed.
- Add the butter and water and paddle on low speed until the mixture starts to come together in small clusters.
- Spread the clusters on a parchment – or Silpat-lined sheet pan. Bake for 25 minutes, breaking them up occasionally. The crumbs should be golden brown and still slightly moist to the touch at that point; they will dry and harden as they cool.
- Let the crumbs cool completely. Stored in an airtight container, the crumbs will keep fresh for 1 week at room temperature or 1 month in the fridge or freezer.
For Apple Pie Filling
- Fill a medium bowl halfway with cold tap water. Juice the lemon into it. Fish out and discard any seeds. You will use this lemon water to keep your apple pieces looking fresh and pert.
- Peel the apples, and chop into small pieces. Transfer these pieces to the lemon water as you go.
- When you’re ready to cook, drain the apples (discard the lemon water) and combine them in a medium pot with the remaining ingredients. Slowly bring to a boil over medium heat, using a spoon to gently stir the mixture as it heats up and the apples begin to release liquid. Reduce the heat and simmer the apples gently for 3 to 5 minutes. Be careful not to cook the apples so much that they turn into applesauce. Using an immersion blender, or food processor- pulse the apples so that a rough pureé is formed. Some small chunks are fine- but you want this to be more like a compote.
- Transfer to a container and put in the fridge to cool down. Once completely cooled, the filling can be stored in the fridge in an airtight container for up to 1 week; do not freeze.
Nutrition Information:
Yield: 20 Serving Size: 1 gramsAmount Per Serving: Unsaturated Fat: 0g
Recipe from the Momofuku Milk Bar Cookbook
I always have such mixed feelings about Milk Bar recipes! Of course they look delicious but they’re always so involved that I inevitably think, “I’ll make that! Just not today. I don’t have time.” If you could recommend one Milk Bar recipe that’s totally worth every second to make it, what would it be?
I’ve tried a bunch of milk bar recipes and the apple pie truffles are definitely worth it! My favorite so far :)
Mmmm they look so good. The tiny bite sized desserts are always the key at holidays. Except then I usually end up eating 4 or 5 because they’re “small.” :)
Mmm love this idea. I need that book!
Totally amazing! I love those pie crumbs!!
I know they seem daunting…but I promise they are some of the most amazing treats I’ve ever had. The corn cookies are a definite favorite though- truly amazing!
Wow, amazing! They look so delicious too :)
Wow, this is such a good idea! I adore apple pie and you’re right, sometimes just a bite will do. I’ve bookmarked so many of your posts lately :)
Audra these look awesome!! I wish I could get the outer pie crumbs to look as good as yours..I need some help with that step lol! This was a delicious recipe and one I can see myself making again.
Heya i’m for the first time here. I came across this board and I find It truly useful & it helped me out a lot. I hope to give something back and help others like you aided me.
I’ve been baking up these treats all morning and have a few questions! .. I was wondering if you could tell me if they apple pie filling should not have much liquid in it .. I discared a lot of the leftover liquid but did leave about a tablespoon in the bottom of the container… You used the entire batch of the soak and apple filling also ? Thank you !!