The Baker Chick

Baking up a delicious life.

  • Home
  • About Me
  • Recipes
  • Work With Me
  • Contact
  • Mama Bird

{Milk Bar Monday} Birthday Layer Cake

June 18, 2012 by Audra 54 Comments

Birthday Layer Cake- The Baker Chick

Last week was my almost-husband Andy’s birthday and this was his cake. From the moment I saw the Momofuku Milk Bar Cookbook and I flipped past this gorgeous, sprinkle-laden cake, I knew it was worthy of a special birthday. Since my turn to pick the recipe for Milk Bar Monday coincided with my fiancé Andy’s birthday, I knew this was the cake he was getting. I mean, how could I not make him this cake?

Christina Tosi aimed to create a replica of the classic funfetti boxed cake that she remembers from her childhood. Even though my Mom never made it, I remember adoring when classmates brought in fluffy funfetti cupcakes with creamy canned frosting. The thought of making a similar cake but from scratch seemed like a dream come true. And it truly was.

Milk Bar Monday Birthday Layer Cake- The Baker Chick

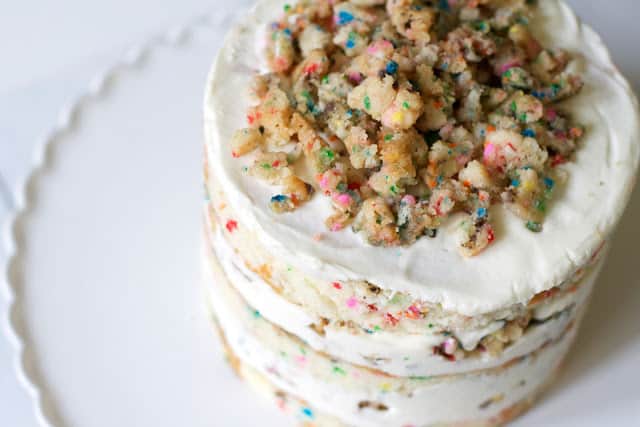
This cake was everything I had dreamed of and more. The cake itself was soft and fluffy, the frosting was creamy and perfectly sweet, and the crunchy birthday cake crumbs layered in between added the perfect contrasting texture. Andy feasted on this cake, and  everyone else that tried it agreed it was the perfect nostalgic comfort food.

The one change I would make next time is to make a bit more frosting. It was so delicious and I ended up a little short. So basically- eating little mini bites of cake scraps slathered in frosting before you make the cake isn’t a good idea..you’ll need every last drop!

IMG_79391

Don’t forget to check out the how the other Milk Bar Monday Girls fared on this fabulous cake:

Cassie from Bake Your Day
Jacqueline from The Dusty Baker
Meagan from Scarletta Bakes
Krissy from Krissy’s Creations
Erin from Big Fat Baker
Nicole from Sweet Peony Blog

Print
Birthday Layer Cake
 
Ingredients
  • 1 batch birthday cake (recipe below)
  • 1 batch birthday cake soak (recipe below)
  • 1 batch birthday cake frosting (recipe below)
  • 1 batch birthday cake crumbs (recipe below)
Instructions
  1. Invert the birthday cake onto a sheet of parchment paper or silpat, and peel off the parchment paper backing. Using the 6-inch cake ring, stamp out two circles from the cake. These will be the top and middle layers. The remaining cake "scrap' will come together to make the bottom layer of the cake.
  2. Clean the cake ring and place it on a sheet of parchment paper or silpat atop a baking sheet. Use one strop of acetate to line the inside of the cake ring. Put the cake scraps in the ring and use the back of your hand to press the scraps together into a flat even later.
  3. Dunk the pastry brush in the birthday cake soak and give the layer of scraps a good, healthy bath of half of the soak.
  4. Spread one fifth of the birthday cake frosting over the base layer. Then sprinkle with one-third of the birthday cake crumbs evenly over the top of the frosting. Use the back of your hand to anchor them in place. Top with another fifth of the birthday cake frosting, carefully spreading it so that it is even, but without disturbing the crumbs.
  5. With your index finger, gently tuck the second strip of acetate between the cake ring and the top ¼ inch of the first strip of acetate, so that you have a clear ring of acetate 5-6 inches tall- high enough to support the height of th finished cake. Top with a full circle of cake (save the nicest one for the top layer), brush the rest of the cake soak over this layer, top with another one fifth of the frosting, one third of the cake crumbs, and another one fifth of the frosting.
  6. Nestle the remaining cake round into the frosting. Cover the top of the cake with the last fifth of the frosting. Give it volume and swirls, or opt for the perfectly flat top. Garnish the frosting with the remaining birthday crumbs.
  7. Freeze the cake for at least 12 hours to set the cake and filling. (And to make the unmolding much easier.)
  8. Three hours before serving, pull the pan from the freezer, and using your fingers and thumbs, pop the cake out of the cake ring. Gently peel off the acetate and transfer the cake to a platter or cake stand. Let it defrost in the fridge for a minimum of 3 hours. (wrapped well in plastic, it can be refrigerated for up to 5 days.)
3.5.3251

IMG_78471

IMG_78671

IMG_78761


Print
Birthday Cake
Yield: 1 quarter sheet cake
 
Ingredients
  • 2 cups cake flour
  • 1½ tsp baking powder
  • ¼ cup + 2 tbl rainbow sprinkles
  • 4 tbl (1/2 stick) salted butter, at room temp
  • ⅓ cup vegetable shortening
  • 1¼ cup granulated sugar
  • 3 tbl light brown sugar, tightly packed
  • 3 large eggs
  • ½ cup buttermilk
  • ⅓ cup canola or vegetable oil
  • 2 tsp McCormick brand clear imitation vanilla extract
Instructions
  1. Preheat the oven to 350. Prepare a rimmed quarter sheet pan by spraying with cooking spray and covering the base with a sheet of parchment. Set aside.
  2. Whisk together the flour, baking powder, and ¼ cup sprinkles in a small bowl. Set the dry ingredients aside for later.
  3. In the bowl of an electric mixer fitted with the paddle attachment, cream together the butter, shortening, and sugars on medium-high speed for 2 to 3 minutes, scraping down the bowl as needed.
  4. Add the eggs (all at once) and then beat again on medium-high for another 2 to 3 minutes. Scrape down the bowl.
  5. With the mixer on low speed, add the wet ingredients (buttermilk, canola oil, and imitation vanilla) in a steady stream. Increase the mixer to medium-high speed and beat for another 4 to 6 minutes. The mixture should double in size and turn practically white. Don't stop mixing until the mixture is completely homogeneous, with no visible streaks of oil or fat.
  6. With the mixer on low, add the dry ingredients, and mix for another minute or so until the ingredients are just combined.
  7. Pour out the batter into the prepared sheet pan, spreading it out into an even layer. Sprinkle with the remaining 2 tbl of sprinkles.
  8. Bake for 30–35 minutes until the cake bounces back slightly when gently pressed in the corner. The center of the cake should no longer jiggle when the pan is shook. Cool the cake completely in the pan on a wire rack.
3.5.3251

Print
Birthday Cake Soak
 
Ingredients
  • ¼ cup milk
  • 1 tsp McCormick brand clear imitation vanilla extract
Instructions
  1. Whisk together the milk and vanilla in a small cup or bowl.
3.5.3251

Print
Birthday Cake Crumb
 
Ingredients
  • ½ cup granulated sugar
  • 1½ tbl light brown sugar, tightly packed
  • ¾ cup cake flour
  • ½ tsp baking powder
  • ½ tsp salt
  • 2 tbl rainbow sprinkles
  • ¼ cup canola or vegetable oil
  • 1 tbl McCormick brand clear imitation vanilla extract
Instructions
  1. Preheat the oven to 300 and line a baking sheet with a Silpat or piece of parchment.
  2. In the bowl of a stand mixer fitted with the paddle attachment, combine the sugars, flour, baking powder, salt, and sprinkles. Mix on low speed until combined.
  3. Stream in the oil and the imitation vanilla on low speed and continue beating the mixture until the ingredients clump and form small clusters.
  4. Carefully spread the clusters in a thin layer on the prepared baking sheet and bake them for about 20 minutes, breaking up occasionally. They will be slightly moist but will harden as they cool. Let them cool completely before using.
3.5.3251

Print
Birthday Cake Frosting
 
Ingredients
  • 8 tbl (1 stick) salted butter, at room temp
  • ¼ cup vegetable shortening
  • 2 ounces cream cheese, at room temp
  • 1 tablespoon glucose
  • 2 tbl light corn syrup
  • 1 tbl McCormick brand clear imitation vanilla extract
  • 1¼ cup powdered sugar
  • pinch baking powder
  • pinch citric acid
Instructions
  1. In the bowl of a stand mixer fitted with the paddle attachment, cream the butter, shortening, and the cream cheese for 2 to 3 minutes on medium-high until the mixture is smooth and fluffy.
  2. Add the glucose, corn syrup, and vanilla, and beat the mixture on medium-high speed for 2 to 3 minutes or until the mixture is smooth and glossy white.
  3. Add the powdered sugar, baking powder, and citric acid on low speed until just combined. Crank the mixer to high speed and beat for 2 to 3 minutes or until the mixture is stark white and fluffy.
3.5.3251

Source: Momofuku Milk Bar Cookbook

Filed Under: Cake, Milk Bar Mondays, Recipes

« Food and Fun at the Lobster Roll Rumble
Bacon Chocolate Chip Cookies with Maple Glaze »

Subscribe

* indicates required

Popular Posts

Comments

  1. Rit says

    June 18, 2012 at 6:13 pm

    That is soo impressive! It actually looks soo delicious!!
    Check out my blog: http://bakingcraze.blogspot.ie/

    Reply
  2. [email protected] says

    June 18, 2012 at 6:17 pm

    Looks really fluffy….mmm would love a slice right now :)

    Reply
  3. Lauren at Keep It Sweet says

    June 18, 2012 at 6:18 pm

    I seriously need this in my life!

    Reply
  4. Sallysbakingaddiction says

    June 18, 2012 at 6:19 pm

    Audra, what a BEAUTIFUL cake. I saw it posted on Cassie’s page and I just had to check out the recipe and pictures here. It looks beautiful! That birthday cake crumb has me going nuts. I bet it would be delicious as a topping for frosted funfetti cupcakes. Tosi’s recipes all look very labor intensive and hard work, but the end results are gorgeous. Love your pictures.

    Reply
  5. Beth says

    June 18, 2012 at 6:20 pm

    This cake is breathtaking. I’ve been a little intimidated by that cookbook, but seeing the results I have to give it a try!

    Reply
  6. Siri says

    June 18, 2012 at 6:20 pm

    I ordered everything I needed on Amazon last week – going to make it for Carson’s birthday this Friday! Was waiting for your post – looks SO beautiful : )

    Reply
  7. Becca Looney says

    June 18, 2012 at 6:21 pm

    It’s been too long since I’ve had anything funfetti :) This cake looks so fantastic and whimsical. I wish I had something like this for my birthday :P

    Reply
  8. Erica says

    June 18, 2012 at 6:21 pm

    Wow, that’s an ambitious cake project! Looks like it turned out great :) I think the first picture of the cake is one of my favourites you’ve ever done!

    Reply
  9. Averie Cooks says

    June 18, 2012 at 6:22 pm

    Sorry that I couldn’t get things together in time to post with you all…this cake looks amazing. And good info that you’d make MORE frosting. Gosh, a girl after my own heart :)

    Reply
  10. Barefootambisiosa says

    June 18, 2012 at 6:23 pm

    I want this cake on my birthday. It looks YUMMY!

    Reply
  11. Cassie @ Bake Your Day says

    June 18, 2012 at 6:23 pm

    Happy birthday to Andy! My hubs’ was last week too. We celebrated with this cake and it was the best ever. Thanks for picking this one, definitely a favorite!! Your photos are stunning too!

    Reply
  12. nicole {sweet peony} says

    June 18, 2012 at 7:40 pm

    I seriously am in love with this cake! It is soooo pretty & delicious! Sprinkles are some of my favorite things ever… I’m obsessed! Yours is gorgeous!

    Reply
  13. Katrina @ Warm Vanilla Sugar says

    June 18, 2012 at 9:52 pm

    This cake is absolutely stunning! I love it!

    Reply
  14. Dinnersdishesdessert says

    June 18, 2012 at 9:53 pm

    This has to be the most amazing cake I have ever seen!

    Reply
  15. Lizzy Do says

    June 19, 2012 at 12:32 am

    Wow, this is one stunning cake! This is definitely a must try recipe :)

    Reply
  16. Andy says

    June 19, 2012 at 1:33 am

    I like the Milk Bar Blueberry and cream cookies, but my beef with Tosi is all her recipes take awhile to make since they are mashups. You have to make so many things in advance like milk crumbs etc. I do wanna try this especially because I had the birthday cake truffles the last time I was at the Milk Bar in the East village.

    -Andy (http://whatandyate.tumblr.com)

    Reply
  17. Krissy's Creations says

    June 19, 2012 at 1:59 am

    Happy Birthday Andy! So happy you chose this recipe :)

    Reply
  18. Audra says

    June 19, 2012 at 2:08 am

    I agree that they take awhile, but so far they have always payed off! Some of the best things I’ve tried!

    Reply
  19. Audra says

    June 19, 2012 at 2:08 am

    Aw thanks Erica! I got a new lens and it is making such a change in my pics!

    Reply
  20. Audra says

    June 19, 2012 at 2:09 am

    Thanks so much Sally! yes- that crumb is addicting!

    Reply
  21. Meagan @ Scarletta Bakes says

    June 19, 2012 at 2:49 am

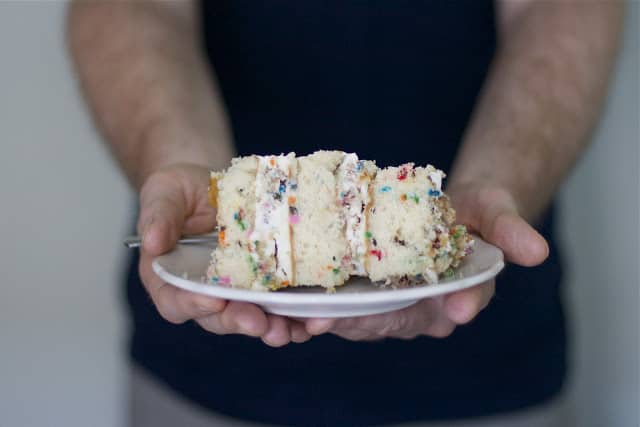
    Your cake turned out SO pretty, Audra! I especially love the pic of Andy holding his slice. Happy birthday, Andy!!

    Reply
  22. In Katrina's Kitchen says

    June 19, 2012 at 1:38 pm

    I just can’t even focus on anything other than this cake today. “Birthday cake soak?!” “Birthday cake crumb?” YES!!! PLEEEEEEASE!

    Reply
  23. Jacqueline Raposo says

    June 19, 2012 at 3:34 pm

    BEAUTIFUL!!! My goodness everything about this post is perfect. Great pick for this week! Brava!

    Reply
  24. Bee says

    June 19, 2012 at 4:55 pm

    These recipes seem so complex but also SO worth it… Now if only I could get some freezer space in my house…

    Reply
  25. Georgia The Comfort of Cooking says

    June 19, 2012 at 8:26 pm

    This looks so crazy good, Audra! I think I’ll have to make up someone’s birthday just so I can make it! ;) Thanks for sharing.

    Reply
  26. Tasha Zee says

    June 20, 2012 at 3:42 pm

    This is the most amazing cake I ever saw. Love it! Will def be trying this one!

    Reply
  27. Chung-Ah | Damn Delicious says

    June 20, 2012 at 8:28 pm

    What a fun cake! I’ll have to save this for my birthday :)

    Reply
  28. BigFatBaker says

    June 20, 2012 at 9:51 pm

    I am so glad you picked this recipe, it was fabulous! I think I am going to make it for all birthdays from now on. Deeeelish.

    Reply
  29. mullajos says

    July 8, 2012 at 11:21 pm

    Would love to make this cake as one of the desserts for my daughter’s wedding. Question: Can this cake be frozen? And if so, for how long? Thank you.

    Reply
  30. Rianne Ackley says

    August 4, 2012 at 2:32 pm

    can you just do this cake in 3 round cake pans instead of a sheet?

    Reply
  31. Swee San says

    October 7, 2012 at 3:26 am

    oh my it looks just like the book!! so so pretty!

    Reply
  32. gluten free foods says

    October 27, 2012 at 4:33 am

    Birthday cakes come in all shapes and sizes, from numbered birthday cakes through to more traditional box shaped birthday cakes.

    Reply
  33. Beth says

    December 3, 2012 at 4:43 am

    Can you share a link for the acetate you purchased? I’m having a hard time figuring out if I’m finding the right thing on Amazon!

    Reply
  34. Audra says

    December 3, 2012 at 7:23 am

    Hey Beth! I got mine at a NYC store called New York Cake and Baking Company but here is a link for an Amazon version: http://www.amazon.com/Unknown-Clear-Cake-Collars/dp/B0008D6U8K

    Also- some of my other MBM friends had success using clear transparency sheets cut into strips!

    Reply
    • Lauren says

      June 19, 2018 at 8:51 am

      what size cake ring do you use?

      Reply
  35. Jeannie says

    December 19, 2012 at 1:45 am

    That is so beautiful! Bet it’s delicious as well!

    Reply
  36. Laura Dembowski says

    December 19, 2012 at 5:18 pm

    I am dying to make this cake. Yours looks amazing! I’m glad to hear it was as good it looks. I think my New Year’s resolution will be to make this cake ;)

    Reply
  37. James says

    March 3, 2013 at 4:45 pm

    This is IT! This is the one!! I’m going to make this for my mum’s 60th. She’s gonna LOVE IT!! :)

    Reply
  38. Alison Jones says

    April 29, 2013 at 2:41 pm

    I am very excited I found this recipe and am planning on making it this coming Sunday for my daughter’s first birthday! However, I am finding it hard to find the citric acid and glucose. Any help?! Thanks!!!

    Reply
  39. Stacy says

    May 1, 2013 at 2:08 pm

    I made this and it was incredible! Thanks for sharing :)

    Reply
    • Audra says

      May 2, 2013 at 7:24 pm

      I’m so glad you liked it! Lots of work but worth it right?

      Reply
      • Stacy says

        May 7, 2013 at 9:38 pm

        Absolutely! I’m going to attempt to make red velvet cake crumbs this weekend.

        Reply
  40. Ellen @ The Baking Bluenoser says

    May 5, 2013 at 10:32 pm

    I want to make this cake but it seems so difficult! Maybe some day I’ll make them!

    Reply
  41. amy googs says

    July 10, 2013 at 4:20 pm

    I made this cake and had some issues:

    1. I couldn’t find acetate at walmart or target so I ended up using posterboard. It worked fine.

    2. I made a simple cream cheese icing instead of all the glucose/etc. This was also easy, not quite as bright white but that might be because the shortening I used was colored (see next comment).

    3. I had some butter flavored shortening which had yellow dye in it to make it look like butter. I didn’t get the bright white =( but it still tasted good.

    4. My sprinkles bled! Don’t buy the Walton brand for this, they turned my supposed to be bright white cake into something greenish.

    5. I made some “big” crumbs to put on the top in a circle. I saw this somewhere on the web and I think it looks a lot nicer than dumping them all in the middle.

    Reply
  42. Hanna says

    February 7, 2014 at 4:17 pm

    This is the 2nd time I’ve made the cake and I can’t get it to rise as much as yours.. Nothing I’m using is expired and I used cake flour (but homemade)… Do you know what it could be?

    Reply
  43. Jimmy says

    March 8, 2014 at 2:41 pm

    Hi!

    First off, I love the way you go through this recipe! it is very thorough and the photos are awesome!

    Secondly, I just attempted this cake and I am having a bit of trouble with the Cake Crumb! When I add the wet ingredients to the dry, low speed on the mixer, it doesn’t seem to clump up at all and does not form small clusters! Is there something I should be doing to make this happen? I’ve had to add more oil and that somewhat helps, but otherwise, I have to form the clusters by hand :/ Hoping you had some advice on how to make the crumb!

    Thanks!

    -Jimmy

    Reply
  44. Raven says

    April 7, 2014 at 9:22 am

    I made this for my daughter’s first birthday party yesterday. It turned out BEAUTIFUL! The directions look lengthy and a little bit complicated, BUT it’s much easier to make than it looks. Everybody went crazy over how adorable it was, and it tasted like a fancy, delicious, frosted animal cracker! :)

    Reply
  45. Emma says

    October 31, 2014 at 2:25 pm

    I’m wondering why she uses imitation vanilla instead of real vanilla extract. Any ideas?

    Reply
  46. Jo says

    August 25, 2016 at 3:32 pm

    I just looove how perfect this cake is! ✨ I just wanna ask, do you need to cover the cake with cling wrap upon freezing?

    Reply

Trackbacks

  1. Awesome April Discoveries: Happy Birthday to Me | Kinda Crunchy says:
    May 9, 2013 at 12:59 pm

    […] The BEST Funfetti Cake EVER- This is definitely more complicated than whipping-up a funfetti cake made from a box, but SO worth it. My hubby and I are both huge Funfetti fans so my baker-extraordinaire bestie, Amanda, whipped this up in cupcake form for my birthday. Thank you Baker Chick for this delightfully delicious recipe! The cookie crumbles make my heart very happy! […]

    Reply
  2. Birthday Cake Roundup | Teenage Cakeland says:
    September 3, 2013 at 9:39 pm

    […] Momofuku Milk Bar Birthday Cake from The Baker Chick  […]

    Reply
  3. Best Funfetti Birthday Cake | The Pancake Princess says:
    September 5, 2013 at 10:17 am

    […] would simply link you to the other fantastic posts out there about this cake, but I did make some substantial changes to the size of this cake. […]

    Reply
  4. Completely Homemade Confetti Cake « Mrs. The Pants says:
    March 24, 2014 at 9:58 pm

    […] Confetti Cake cake recipe adapted from Cookies and Cups confetti cake crumb recipe from The Baker Chick frosting recipe from my […]

    Reply
  5. bake the book series - momofuku milk bar, nyc - bake.love.give. says:
    January 12, 2015 at 4:10 pm

    […] Milk Bar Birthday Layer Cake – the baker chick Momofuku Milk Bar Crack Pie – Brown Eyed Baker Momofuku Milk Bar Corn Cookies – Savory Simple Momofuku Milk Bar Cornflake Chocolate Chip Marshmallow Cookies – We Are Not Martha […]

    Reply

Leave a Reply to Cassie @ Bake Your Day Cancel reply

Your email address will not be published. Required fields are marked *

Rate this recipe:  

  • Facebook
  • Pinterest
  • Instagram
  • Twitter
  • RSS
  • Google+

Never Miss a Recipe!


Featured Recipes

Apple-Cinnamon Crumble Muffins

Caramel Apple Upside Down Cake

Pumpkin Muffins with Brown Butter Glaze

Buttermilk Spice Layer Cake with Brown Sugar Cream Cheese Frosting

Categories

Archives

Connect

user profileMeet The Baker Chick → Read More…

  • Facebook
  • Pinterest
  • Instagram
  • Twitter
  • RSS
  • Google+

Copyright © 2019 ♥ Design by Deluxe Designs