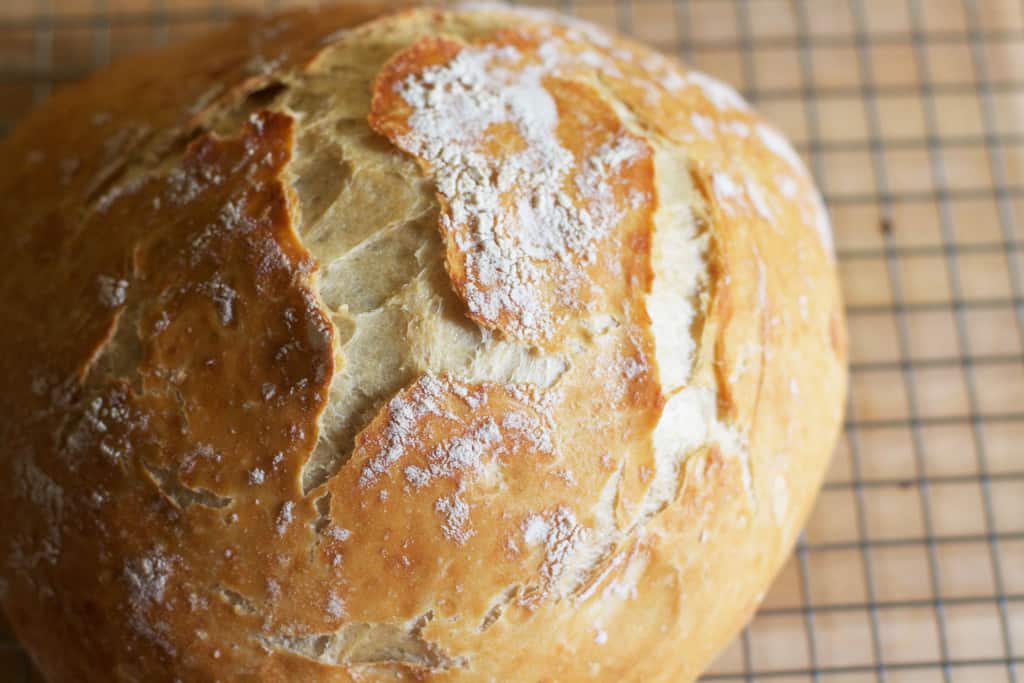
No-Knead Crusty Artisan Bread
Even though I’ve made it a few times now, homemade bread has always been something I put in the “do-able but time-consuming” category. It’s something I’ve conquered, but for the everyday- I don’t often have the energy to deal with making dinner as well as homemade bread on the side. Well- this recipe has truly changed my views on bread forever! It literally takes 5 minutes to prepare the dough, it sits out overnight, and bakes up in no-time.
It’s possible you’ve seen a version of this recipe before. My Mother-in-law made a couple different batches when we visited recently, and ever since I’ve had it on the brain. Where this concept actually originated? Who knows. I mean making bread from nothing but flour, yeast, salt and water must be an ancient concept right? Around the same time my MIL sent me her recipes, I found a great post on via Pintrest with a tutorial of almost the exact same recipe. I knew it was time to see how easy this bread actually was to make. Because really- how could this perfect golden, crusty bread be so simple? I’ve outlined the process below:

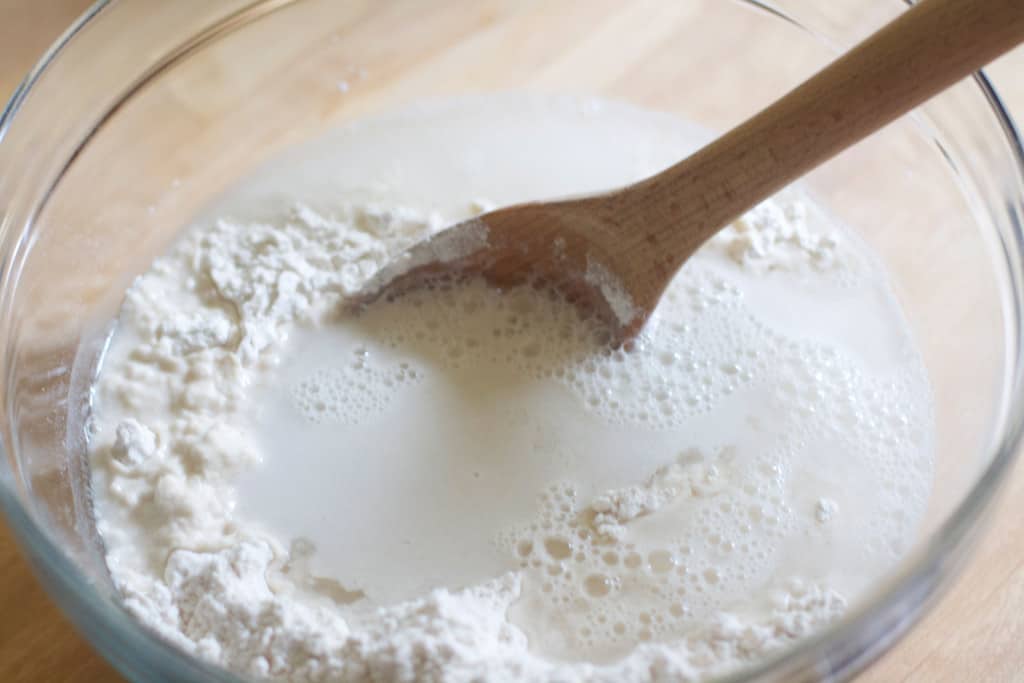
The four ingredients (flour, yeast, salt and water) are combined in a large bowl and simply stirred together.
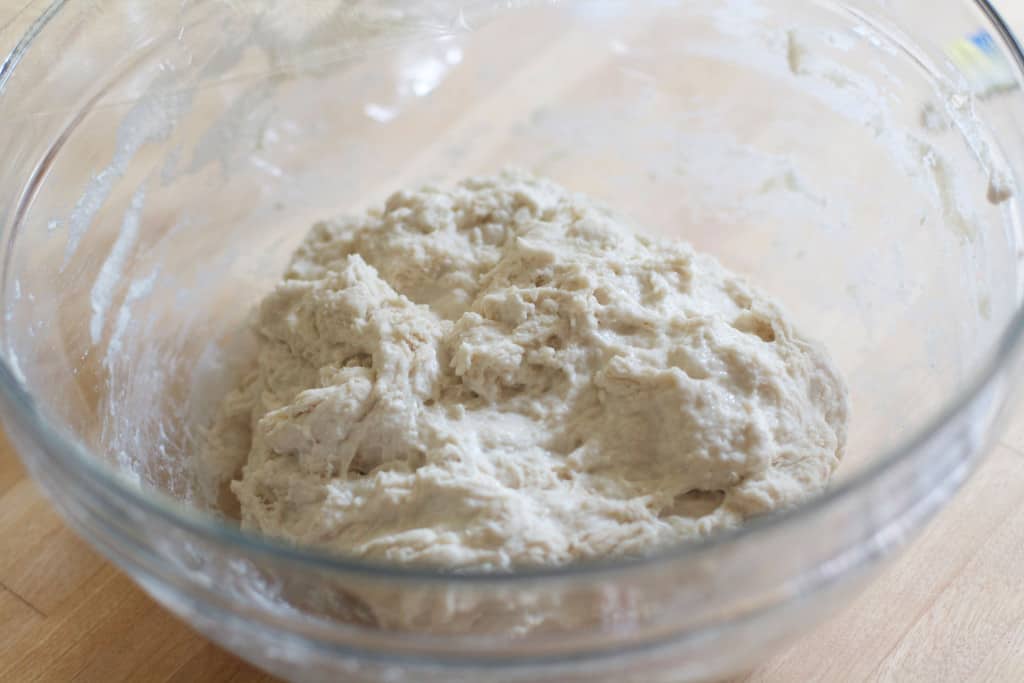
No kneading is necessary, and the goal here is a messy, shaggy dough which is covered in plastic wrap, and left to sit on your counter overnight. (8-18 hours.)
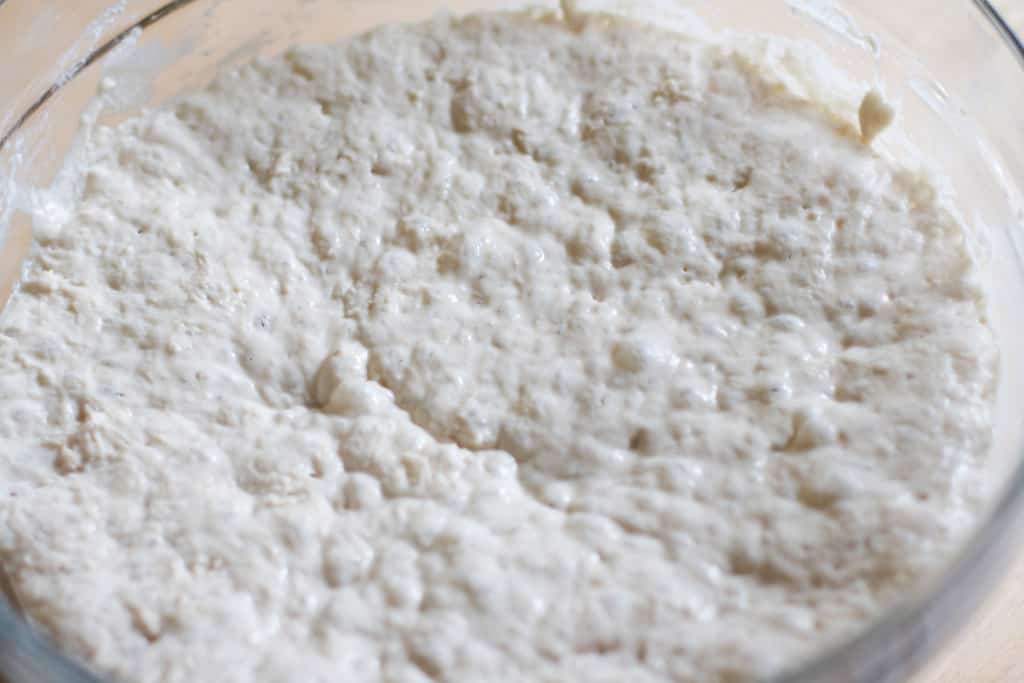
After that time has passed, the dough will look puffy and bubbly, and will be a bit sticky to the touch.
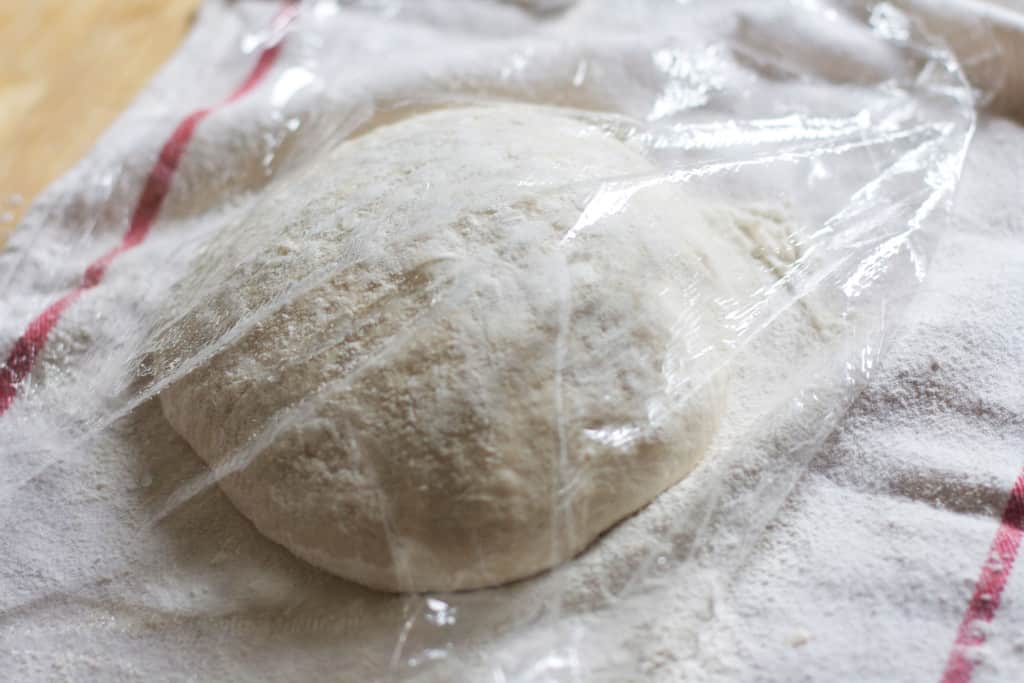
Turn the dough onto a floured surface and shape it into the ball.
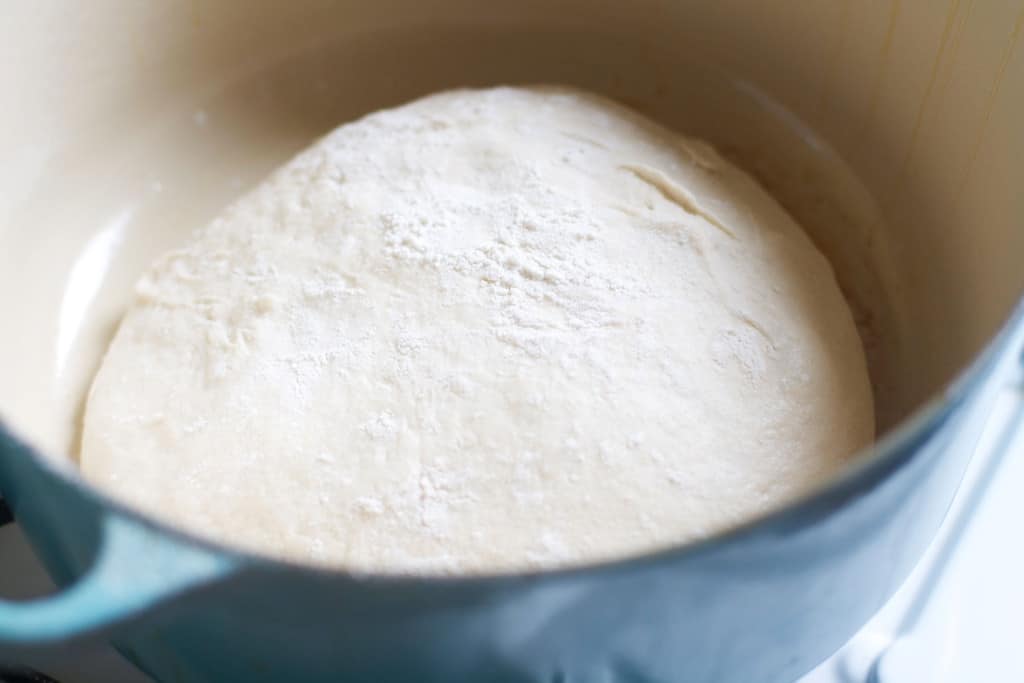
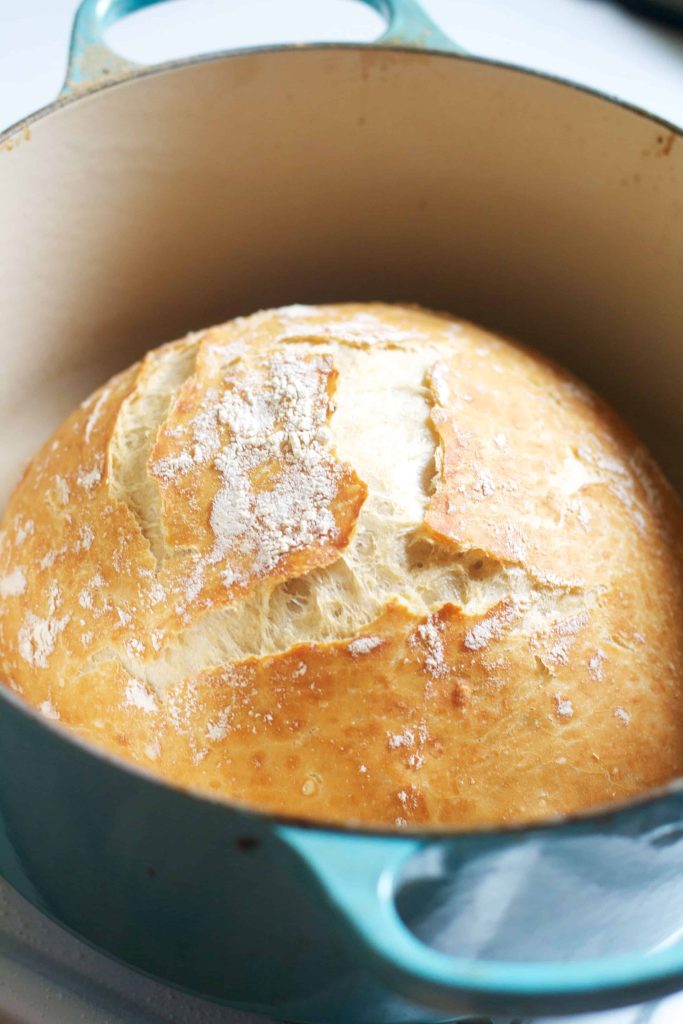
After the oven (and dutch oven) have pre-heated- in the bread dough goes- to bake for 30 minutes covered and 15 minutes un-covered to crisp and brown the top. Covering your dutch oven while baking creates a steamy affect, which makes the inside perfectly soft while creating a perfect, golden, crust.
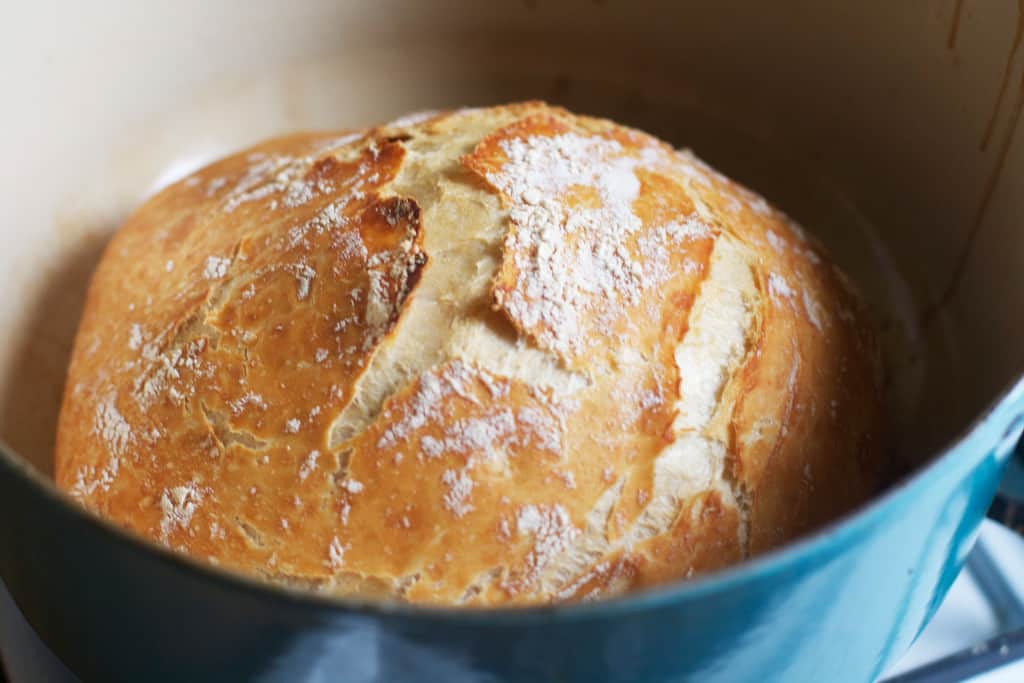
Right out of the oven- I mean come on… It’s that easy! There are many options for mix-ins and different flavorings with this recipe, and I promise to share any gems I discover along the way.
*No dutch oven? I’ve done a little research on the subject, and it seems to can still get crusty bread without one. Any heat-safe covered pot will do, as long as any handles/knobs are safe to be heated up to 450F. The cover is what really locks the steam in and creates the perfect texture. Here is a great forum about alternative options.
(One other method that my MIL also used, involves a steam bath on the bottom shelf while the bread bakes on a pizza stone or baking sheet. Put a broiler pan or baking dish in the oven while it’s preheating, and right before baking- carefully pour a cup of hot water into it. Shut the oven door quickly and let the steam do it’s thing!)

No-Knead Crusty Artisan Bread
Ingredients
- 3 cups all-purpose flour
- 1 1/2 cups luke-warm water
- 1-2 tsp sea salt
- 1/2-1 tsp yeast*
Instructions
- In a large bowl, stir together the flour, salt and yeast. Add the water and using a wooden spoon stir together until the mixture resembles a shaggy dough.
- Cover dough with a plastic wrap and let sit in room temperature for 8-18 hours. Dough will bubble up and rise.
- After dough is ready, preheat oven to 450 F.
- Turn the dough onto a well-floured surface and with floured hands form the dough into a ball. Cover with the plastic wrap and let the dough rest.
- While dough is resting, put your dutch oven into the preheated oven for 30 minutes.
- After the 30 minutes are up carefully remove the dutch oven and with floured hands place the bread dough into it. (You can put a piece of parchment under it if your dutch oven doesn't have an enamel coating.)
- Replace the cover and bake for 30 minutes covered. Then remove the cover and bake for an additional 15 minutes uncovered. Bread will be golden, crusty and delicious!
Notes
*I used a full teaspoon of yeast because I like the flavor in bread. 1/2 teaspoon will work as well if you do not! I like salt a lot- I have added up to 3 teaspoons to this recipe and it's been great!
Nutrition Information:
Yield: 1 Serving Size: 1 gramsAmount Per Serving: Unsaturated Fat: 0g
Recipe from my Mother-in-Law with lots of help from this post from Simply So Good.
I would LOVE a slice of this for breakfast this morning. It’s gorgeous, Audra!
Somehow when I used to make no-knead bread it never turned out that gorgeous! I’m quite enamored!
I made this EXACT recipe from Simply So Good and I’m stunned at how easy it was. I always find bread intimidating and this is as easy as it gets. My next plan to try some mix ins, like cheddar and chive or something.
And your loaf is picture perfect!
So great right? I’m gonna try some mix-ins this weekend!
Thank you so much for mentioning Simply So Good. The bread recipe is a keeper for sure.
I’ve never tried this recipe, but a steam bath & pizza stone works great with others. Thanks!!
Oh good to know! I’m gonna try that method next! :)
There’s nothing better than homemade bread and no knead? Bonus!!! Have to make this :)
Not much right? So easy! :)
no knead? Sold. I need to get better about making homemade bread. This sounds totally doable!
It really is! I’m usually such a scaredy cat too!
I love that this is made in your dutch oven!!
Me too! I need more reasons to justify the purchase! :)
Hi
I have a small oven proof porcelain pot with a lit. Can I use that one? Also will the bread rise a lot in the oven? Because my porcelain pot is pretty small ;) Thanks so much!
Hey! I think the porcelain pot would work just fine. In terms of the size- I used a 5.5 qt sized dutch oven and it was plenty big, (with much room to spare.) It will rise a bit, but not tons. Maybe break it into half batches if it’s extremely small?
Update: I made this with my Mom in a porcelain casserole-type dish with a cover. It worked great! :)
Nice job, daughter-in-law
Thanks :) I can’t wait to try your other recipes!
what i “knead” is a dutch oven. like so bad. i am so jealous every time i see one!
I got mine for about $20 at an Aldi. Its’s no Le Creuset but it gets the job done.
This over 2 years but watch for kitchen ware (dutch ovens) @ estate or yard sales. That’s where I found mine (1 porcelain coated and the others regular cast iron)
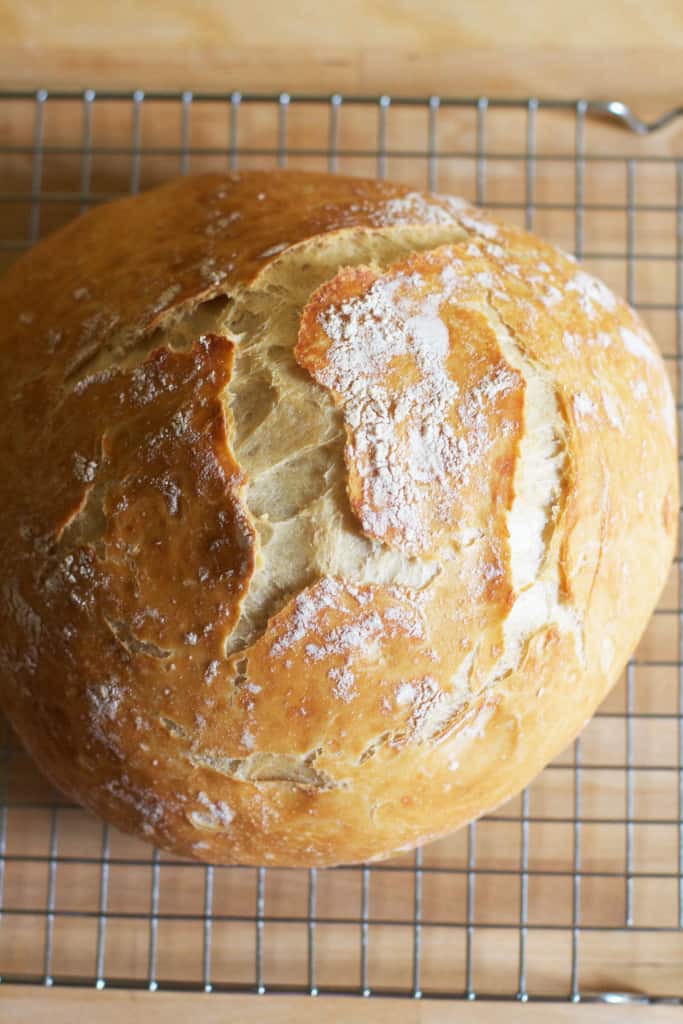
Look at those air pockets…
Guess what’s for breakfast Sunday?!
Oh my goodness! The ingredient list is so short; I don’t think I’ve ever seen recipe that short before :) And crusty bread is sooo delicious! I love the texture and the crackle it makes when you pull it apart. Yum
Omgooodness, this looks amazing! I’d have a hard time stopping at one slice…
I sure did :) Had half of that loaf right after I took the pics! :)
This looks super fab! I’m like you – I’ve baked bread before but it seems *such* a faff. I’ve pinned this & will make it next weekend for a gorgeous Sunday breakfast. Thanks for sharing it.
Um, I must have done something wrong. It tasted, well bland. I made it sit for 8 hours because I wanted it for dinner. Will go longer next time. I think 20 – 25 minutes is perfect to make it golden. Just didn’t like the taste : (
Thank you for sharing.
Hmm- I’ve made this 3 times now and I have been adding extra salt which I like. Also, feel free to mix in some cheese/herbs etc. to add flavor?
I am thinking it’s missing the sweet flavour you’re used to in french bread … try adding a little sugar or honey to bring out the yeast & salt flavours! :D
I don’t make homemade bread all that often either because it’s pretty much my kryptonite. Slice after slice after slice – I can’t stop :) I love this recipe though, it just doesn’t get any easier and your loaf is gorgeous!
what a gorgeous loaf!
I really need to try this out; I love making bread, but I hate kneading it and getting my counter all messy over and over again, hah. I just need to remember to get it all together the night before!
We made the bread this weekend. I added about 1 cup of shredded cheddar and some fresh (we have a plant) minced rosemary. Yummy! The hard part was waiting for it to cool enough to slice it.
I have one note: If your oven isn’t the cleanest, be prepared to run your exhaust fan on high. Running the oven at 450 for over an hour can generate fumes similar to running the oven cleaner. Mine was so-so. ;-)
Cheddar and Rosemary sound amazing! And thanks for the oven-cleaning tip!
Did you add the cheese when you first mixed the dough and let it sit? I want to do fresh garlic/parm baguettes using this recipe, but am a bit hesitant about letting is sit out with fresh cheese for at least 8 hrs.
Yeah I add everything from the get-go. I feel Ok about letting it sit out but it’s up to you :)
I love that such simple ingredients can combine to create such an amazing bread! This looks delicious and so simple, Audra! Thanks for sharing.
I just made this bread for the first time (and my first time ever making bread) and it came out beautifully!
Yay! I’m so glad you liked it! :)
Rachael,
I also made this loaf as a first time bread maker. I couldn’t believe how good it came out. The looks
and taste were awesome.
I seriously can’t wait to try this! I keep hearing about a 5 minutes artisan bread! Thank you for posting! Sometimes there is nothing better than homemade bread! Its beautiful! ;)
Thanks Alaina! It’s seriously the easiest thing I’ve ever made. :D
I have found that substituting one cup of rye flour and adding 2 cups of grated parmesan and 1TBSP of chopped fresh rosemary makes a really good alternative for the all white
Oh great! Does it taste like Rye Bread?
It doesn’t taste like rye bread because you need caraway seeds for that, but the rye is not as overwhelming as whole wheat and doesn’t seem to have a negative effect on the texture and it lets the cheese and herbs stand out
Hello,
Had a question about the rye flour addition, are you adding 1 cup rye flour and 2 cups white to make up the 3 cups of flour?
Hi Ronda,
Yes- you can sub one of the cups of AP flour for rye flour :)
I made this last night and it was fantastic! I’ve made the “artisan bread in 5 minutes” many times in the past and it never came out as beautiful as this loaf did. Having done the pizza stone/water bath and now the le creuset method, I can say that the latter is far better. With the pizza stone, the bread would often spread horizontally instead of vertically. The Le Creuset’s results were wonderful!! Do you have any ideas (besides eating it immediately from the oven!) for storing? I notice that the ‘crustiness’ goes away after a day.
I have experimented with this, and the only thing that kept it crusty for me was to store it in a paper bag. Anything else seemed to create moisture that made it soggy :)
Store it in a ceramic baking dish with a ceramic top. It stays soft on the inside and crisp on the outside.
Great suggestion!
Do you think a Tagine would work?
Just made this tonight – great texture! Threw a sprinkling of kosher salt on the top, and it made the crust extra good!
Yay! A sprinkling of salt on the top sounds amazing!
i just mixed my first batch of this bread going to let it set until dinner time tomarrow. if the family likes it i will do another one with jalapino’s and chedder.
This is literally the best bread ever!! I’ve wolfed down half a loaf already and it’s only been out of the oven for an hour. :) Thank you for sharing this great recipe.
I do the same thing. I can’t stop! So glad you enjoyed it :)
I’ve been dying to try this. I don’t have a dutch oven, yet. Wonder if a clay roaster w/ lid would work? Might need to experiment tomorrow.
Absolutely!
It looks sooo tasty! Can I use dry yeast?!
Yup Vani- I used dry yeast!
Sorry for the late reply- this came in while I was in Europe and I just saw it. :)
I want to make this but I have a question! I just bought my first Le Creuset piece (to make this bread) and in reading the booklet that cane with it. It states to “never preheat a dry, empty pan” and it also states to never “dry cook” any foods – always grease/spray/prepare the pan before cooking. I certainly don’t want to ruin my brand new, expensive pan the first time I use it……but since you do this all the time, I’m assuming its really NOT an issue?????
Hey Joy! Mine is very new too and I use it no problem. Sometimes it needs to be cleaned well afterwards and the rim of the inside gets a little bit charred- but a little bar-keepers friend and a gentle sponge work just fine. You can also line it with parchment if you want- but I actually never have.
If you don’t want to use it for the bread- (though it’s the best) any covered oven-safe pot/dish would work! :)
I used my crock pot liner for this not the electronic part that heats up but the actual inside pot with a glass lid that fit on to it. It worked out great and bread ended up super crusty and delish!
PS. yes my name really is Audra!
That is a great idea. Thank you.
Has any one tried to freeze the dough or the bread and then reheating it? I made this once for my mother in law and she requested I make ten loaves for an event afterward! Any suggestions on it?
Hey there, as for freezing and thawing bread, easily done, just allow bread to thaw for an hour or two on the counter (not in bags) then 15 minutes before serving run each loaf under a little water (I know it sounds crazy) and place in a 350 f oven for 10 minutes. It might not be exactly like it was the first time, but makes for an excellent crust anyway (this method can be used on any loaf, great way to make a store bought loaf feel home fresh) also I gave this recipe to a friend of mine to try with gluten-free flour, since your not really activating the gluten as much, she really liked it!
Hello! I’m dying to try this recipe over the weekend but I don’t have a dutch oven… Do you think a casserole dish (which I believe is ceramic?) with a glass lid would be okay to use? I mean it’s obviously oven safe as it is a casserole dish, but… Lol, I’m just worried I may damage it or ruin the bread!
Thanks in advance :)
Yes that will work just fine!
Hi I am making this bread as we speak. It is on its last 15mins in the oven. I can not wait to try it, thanks for sharing this recipe with us all.
You’re so welcome. ! I hope you liked it! :)
Hi I am making this bread as we speak. It is on its last 15mins in the oven. I can not wait to try it, thanks for sharing this recipe with us all.
The bread was amazing and the whole family loved it. I used a covered casserole dish and it worked out great. I would describe the bread as a baguette type of texture and taste. Just a wonderful recipe and I am making another loaf for tomorrow. Thanks again.
Could you please more specifically address that issue raised by Joy on March 25 re: manufacturer’s instructions to NOT heat my new cast iron enamel coated pot while empty, yet your instructions say to preheat it empty for 30 min. @ 450 degrees. How can I be sure preheating wont damage my new pot? If I oil the pot first, will this make it “not empty”? Will the oil discolor the new whit surface? Is this what you’re talking about that can be removed with Barkeepers Friend and a gentle scrubbing? Sorry for all the questions, and thanks for the help.
Hey Val- I did answer her question- if you scroll down you’ll see my reply right under hers.
I use my new Le Creuset and have had no problems. I don’t suggest any sort of oil in the pan. This is a very common form of bread-making and it doesn’t seem to be an issue. Sometimes the very outside rim of the dutch oven gets a little bit of black soot-like residue after baking- but it easily cleans up with a soft sponge and some barkeepers friend.
OK, thanks!
Hey guys, about the le creusets:
If you have a black round handle on the top (or any handle that isn’t the same material as the pot itself) make sure it can handle the high oven temps!
When I was looking to buy one, I noted that the box said it was oven proof to 375, but I didn’t think that was a problem because normally dutch ovens are “low and slow.”
Then when I was researching this recipe (it’s part of the reason I bought a dutch oven, after seeing it everywhere around the internet) I see that it calls for a super high oven heat. And one website mentioned that people’s black caps are exploding!
You can get a new one from le creuset (the webpage mentioned that the company would send one for free) or you can order a stainless steel one that can take the higher temps. supposedly. Luckily for me, I ended up finding on in the size I needed on clearance, and it is an older model I guess, looks different than all the ones you see online/in stores atm and has a built in handle, so I think it will be fine.
LC makes two different black knobs, one of which is only guaranteed to 375 degrees. Just go to any home improvement store and replace the knob with an all-metal cabinet knob— a very inexpensive solution!
Audra, I’m in awe of how this turned out! I followed your recipe exactly and I now have a beautiful artisan bread! It’s so crusty yet fluffy, and I can’t believe how easy it was! A couple notes though.. mine needed only 9 hours rising and 7 minutes to bake uncovered before it was golden brown. Thank you SO much for the recipe! I hope you don’t mind if I share it at some point, with credit to you of course! :)
I’m so glad you liked it Georgia!! It’s it amazing how simple it is?
Of course share away! This is a recipe that everyone needs to have.
Good to know that there’s a range for the browning time- I should note that! I think if you let it rise longer- it still ends up OK- One day I left it for 24 hours and it just had a richer yeastier taste! :)
I might do the same thing as Georgia, if that’s fine by you! :)
Of course!!
Tried this out today, and it was great! It worked exactly as you said it would, and tasted great. It’s going to be a regular in our house, I believe! So good for moms who find it hard to make regular bread because of timing!
Can you use whole meal or rhy flower instead of white all purpose flour. Will it still work?
Hey Mary- I don’t recommend wheat flour but my Mother-in-law says she has subbed some rye flour in with success! If you scroll through the comments you can see her notes. Her name is Sue :)
I’ve made bread of all kinds for many years and this is by far the easiest I’ve ever attempted. It literally looks just like your picture and it was done in a corningware dish in the oven. Even my dogs, who are avid bread lovers, gave it 2 paws up!!!
I’m so glad you found it easy too! Isn’t it the most satisfying thing to pull it out of the oven? :)
Thank you so much for posting this recipe. I am making it for the second time today. The first time I made it, it turned out perfect. Love your blog!!!
Yay! I am so glad to hear that. Thanks so much for reading and taking the time to comment. :)
Anyone tried to make it into a sour dough loaf. Any suggestions?
I love this bread, have made it a couple times and now want to add cinnamon and raisins but not sure
of the amounts of each to add. Can anyone out there help?
Hey Cheryl! You’ll have to experiment a bit but I’d say 1/2 cup of raisins to start and a tablespoon of cinnamon. Of course more/less depending on how much you like :)
Has any one tried to freeze the dough or the bread and then reheating it? I made this once for my mother in law and she requested I make ten loaves for an event afterward! Any suggestions on it?
Just so you know, there is a marvelous bread dipping sauce on the web site “The Recipe Diva”, it is better than any I have tried, I also add more red pepper flakes, like my things spicy, but that is my taste.
Hope you’ll give it a try.
Thanks for letting me know! That sounds yummy!
Can’t wait to try this! I will have to opt for the “no dutch oven” option, but i am super excited! Thanks for your wonderful recipes. I love bread!
I made this bread with dumped some sesame seeds over the parchment, spread them out a bit, put the dough on top, then covered with more sesame seeds and let it rise a bit more.
I love this recipe even without the addition of sesame seeds and everyone I’ve made it for has LOVED it. :)
Thank you.
“Happiness is right around the corner, but first you must decide to turn.”
I love the sesame seed idea! You reminded me I need to make a batch of this asap!
Great recipe! I started making this last night (on a whim after watching Great British Bake Off) but probably ballsed up slightly. We only had wholemeal bread flour left so used that… After leaving over night (a good 12 hours) I added a bit more salt and some chopped rosemary (LOVE rosemary bread…) then stuck some rosemary in the top and popped it in a ceramic dish (with a lid). After 30 mins, it looked great, so left for a further 15 and it browned up nicely. Felt cooked, nice and crispy. However, I cut a corner off and it was still quite gooey… I figure the brown flour does need a bit of kneading?
Anyway, it’s back in the oven still cooking away until I think it’ll be ok! The corner bit cooked up and was delicious… here’s hoping!
I have actually bought some normal flour this morning so will be giving this another go properly. Thank you for the blog!
T
…. it didn’t work. Had to cook it down for ages. Just ended up small, HARD and still not cooked.
White flour for the win!
Yeah- I haven’t had any luck switching flours out- it works so perfectly with all purpose flour! :)
Oh my goodness!!!! just made this and already half the loaf is gone! It is perfect. And EASY!!1 Thanks for sharing.
Any idea how to make a sour dough variation of this? Thank you!
See my comment below, this simple substitute made it taste more like San Francisco sour dough bread.
This is a wonderful, easy bread recipe. I too wanted a sour dough variation so I tried 1 1/4 c. buttermilk and dissolved the yeast in 1/4 c. of water. I used an old mini roaster pan to bake the bread & it turned out divine…thanks for sharing!
http://xoxograndma.blogspot.com/
Great tip on adding buttermilk Joy! I look forward to trying it that way :)
I think this bread is terrific. My only concern is the energy used preheating the Dutch oven. I would wonder why I couldn’t put the Dutch oven into the cold oven, preheat them together and then let the Dutch oven in there for maybe 15 minutes longer. Has anyone tried this?
Hi
I always do the dutch oven in as the stove is warming up and the bread turns out great (that is what the recipe calls for).
nice recipe … I had success with the following modifications: used a full teaspoon of active dry yeast since it was a year past its expiration date, it worked fine with 110 degree water (used my digital kitchen thermometer), but I’d cut it down to maybe 3/4 tsp because it tasted a bit yeasty when finished; put the bread in a Calphalon 2 quart steel pot, lined with aluminum foil rather than parchment paper and tightly covered with 3 layers of aluminum foil instead of a lid after the initial preheat (be sure to use kitchen gloves to prevent burns when putting the foil on the hot pot, folks); baked the bread in a big Oster toaster oven at the recommended 450 degrees – and found that the only thing to watch out for is overbrowning when you remove the aluminum foil for the last 15 minutes, since the bread is much closer to the heating element it browns quickly compared to a regular oven; so I recommend browning for 5 minutes then slipping a sheet of foil over the bread very loosely to cover it for 9 more minutes then taking it off for the last 4 minutes … worked like a charm, here are photos of the results … http://www.flickr.com//photos/21361059@N05/sets/72157638672862556/show/
Thank you for the feedback! I’m so glad you found a way to make it work!
no problem … and to correct my math above, the next to last phrase should read “I recommend browning for 5 minutes then slipping a sheet of foil over the bread very loosely to cover it for 7 more minutes then taking it off for the last 3 minutes … ”
;>
I made this bread (my first time at making bread) and it turned out perfect. This could not be easier or more inexpensive. Do you have a similar recipe for sweet bread say cinnamon raisin or can I add a little sugar, cinnamon and raisins to the dough after the initial rise time before baking?
Made this bread today and though I added a little extra water as my dough seemed too dry it has turned out brilliantly, thanks!
I just tried this today and it was delicious! My family ate the whole loaf in less than 30min haha. It was really good and it turned out just like your picture, successful!
Only thing was that the inside seemed a little more chewy dough. It was definitely baked right, but it still seemed sticky and dough-like, but other than that it was still delicious and golden on the outside :)
Do you know maybe what I did wrong, or is that how soft it should be inside? Also by any chance, do you know how to make the loaf more stale/chewy? Like real french bread, not the stuff we get here. I was just wondering because the bread I tried in France was a regular size loaf, not the skinny baguette, but it was sooo good!
Definitely will be making this again along with a lot of other bread recipes! Thank you!
Just sounds like there was to much liquid, or slightly under baked. Try again with slight adjustments it should be fine.
The best bread ever!!!! I followed the instructions exact, and left it overnight for about 20 hours. Thank you!!!
Hi Audra,
My husband, Jim, insisted that I write and “thank you” from him for this amazing recipe. I make it almost everyday and he loves coming home to a fresh loaf just out of the oven. It’s a no fail bread, easy to make, and comes out perfect every time. You can’t ask for more than that! I had my doubts in the beginning, but when my first loaf came out looking like yours, I knew I had a winner :). I shared the recipe with my daughter in NC. She made it with great success as well (much to her family’s delight). She has shared it with all of her friends at work who love it as much as we do. Thank you, Audra, for this and all of your other amazing recipe’s. So glad that I found your site :).
That is so sweet. I am so glad you and your husband like the bread as much as I do. I just made a loaf today!
could you please provide more detail on when the dough has “rested” or risen? should you
wait until it doubles/ triples in size? and when you place it in oven how to handle it so it does
not collapse and lose the airholes? I
I have struggled for years trying to get both a crispy crust and a lot of air holes, it always flattens
out to pancake and seems too dense. . thankyou
I made this a few times and have tweaked it a bit. First I switched to King Arthur bread flour (12% protein). I only use 1/2 tsp of yeast to have a longer slower fermentation process, the slower the rise the more air and sweeter the taste of the bread. I also increased the water to 1 2/3 cups at a temperature of 110. I let the dough rise for 16-18 hours in a glass bowl that is sealed with plastic wrap. I minimize the amount of touch and manipulation of the dough from bowl to baker. I turn the proofed dough out on lightly flour dusted parchment paper. I bake it on the parchment paper for the set time and it turned out fabulous with these changes. Note each kitchen will vary depending on temperature of the room and oven. Our house is kept at 68 degrees. I also put garlic pepper and pink salt on the top of the dough prior to baking.
Thanks Cali for these tweaks. Because I made the bread for the very first time as directed and added a bit more water, but used 3/4 tsp of yeast and let it sit for like 20 hrs. It didn’t rise very much and while trying to turn it into a ball, I thought it was too much manipulation, thus is the reason for a flatter and denser bread with a tough to cut thru, crusty, crust. At any rate it was absolutely delicious with some butter, mmmmm. So I’m going to try it your way and hopefully I will end up with all those gorgeous holes and fluff that everyone speaks of Since I really don’t want to buy commercial breads anymore, ever since I had a few loaves that had a few slices left in them that I let expire for months later only to find that they didn’t even mold! Yuck! So I’d rather know what’s in my bread and save money by baking it myself.
I fancy myself pretty good in the kitchen, but I’d never attempted bread. I tried this recipe two days ago, and my husband has already requested another loaf! Thanks, Baker Chick! (Also, your mint julep cupcakes rock, too!)
I felt the same way about bread- I’m so glad it worked out for you! :)
Looking forward to trying this. Do you use rapid-rise or regular active yeast?
I use the rapid rise, 1/2 tsp.
i LOVE this recipe! i used a covered stone wear casserole to cook it and was not disappointed! i did have to lengthen the uncovered cooking time as it is cold and wet here right now but this could be habit forming! thanks for sharing.
Hi just wanted to say a big Thankyou for this recipe … I did it exactly as the recipe and it turned out beautiful very similar to a well known french artisan bread cafe in Central London that I once enjoyed . I would just like to say this is the perfect crusty loaf for real butter and homemade jam or even for accompanying a homemade stew and it is easy to fit around a busy lifestyle I made this at 740pm and left it overnight and baked it the following morning after approx 14 hrs and it looks exactly the same as your pic and tastes Devine. I had salted butter and my homemade damson jam which I’d be happy to share the recipe for. I will be making this bread at least 4 times a week from now on. I would also like to add that I used what I had in the cupboard at the time and this is extremely cheap to make I only had smart price plain flour which is the cheapo value supermarket own brand and I use the cheapest fast acting yeast which is also a supermarket value brand and you just would not believe it when u eat this bread so there’s no need to splash out getting the best of the best … Happy days!!!
My mom has been making a version of this bread for years and I just googled it and was so happy to come up with your step-by-step photos and instructions! I will be making this to serve with dinner tomorrow night!
Hi Mercedes,
You sure won’t be disappointed! It has become the favorite bread in our home. I make it at least twice a week – two loaves at a time. Warm, fresh out of the oven is the best! Any leftovers (which is seldom) are toasted for breakfast. Have fun with it.
This bread is ridiculously good tasting and so easy, thank you so much for posting it. It has revolutionized how we eat bread in my household, I am no longer going to the store and buying loaves. Like many others breads have always been intimidating, and baking itself I’m not too good at in general. The morning of I make my dough, get some soup going in the crock pot, boogie to work for 10 hrs and come home to serve fresh bread and soup de jour practically done! My two favorite addings are as follows…
-1/4 cup olives, 1/4 cup garlic gloves and fresh rosemary
-beer substituted for water
Thanks again this recipe rocks!
Great ideas for the add-ins! Will have to try this. My first loaf is proofing now…
My beautiful, yet picky preschooler and toddler both enjoyed this bread this morning! (of course smothered in Nutella) I think my oven runs hot as it only took 20 minutes, the bottom is a little tough, and the inside still a wee too moist for my liking … I had this same issue making buns last weekend! Better to have a hot oven than cold one I guess!? I did add a tbsp of sugar to give it a French Bread sweetness. (but that’s just my preference) Excellent recipe! I will be making this again! Oh – and congrats on the home birth of Hugo! What a cutie! I hope he grows up less picky than my littles! :D
Just made this today. It was fabulous. I made it in a deep casserole dish and put a cookie sheet over it. Worked like a charm! Thanks.
it was my 1st try to make hard crust bread. I followed the recipe and timing result is just great. family loves too. thanks
https://scontent-b-ord.xx.fbcdn.net/hphotos-ash4/t1/1005681_4994231388403_1294983929_n.jpg
There’s a picture of mine when it was finished. It was so good. I’m thinking about making another loaf today.
Your no-knead crusty artisan bread is wonderful. My Brooklyn-born hubby is very picky about bread and he asked for seconds, saying don’t lose this recipe. Thanks so much for posting this. I would recommend this to anyone. I have tried a few recipes in the past for bread and wasn’t impressed with the outcome (probably my fault), but this came out perfectly.
Hi, I read your recipe and the one you referenced at http://www.simplysogood.com and decided to try it with a combination of whole wheat and all purpose. Although the bread was not as airy as the one in your picture, it was delicious.
Add to your email list please
Hi Peter! If you want to join you just have to click the link at the very top of the page- they need you to verify your email address once you join.
Wow! Made this today and my family devoured it!!! I love how hared the crust was! I will be making another loaf tonight and maybe every night!
Wonder if you can use Gluten free flour ?
Sorry but I’m not sure- I don’t have much experience in G-free baking
I tried this method with “Erika’s Gluten Free Flour Mix”. I have used this mix when making bread the traditional way so I thought I would try it the “crusty” way. I use a cast iron dutch oven with parchment paper on the bottom for my bread. I baked it at 450 for 30 minutes and it was a little over done. I will do it again in the future, but for anyone trying it before I can get it perfected, I thought I would share my findings. Next time I will try it at 425 and check it after 20 minutes.
THIS recipe has turned me into a crazy bread-baking woman! People are blown away by the quality!! Have tried all kinds of variations—more water, more yeast, more salt, less of each, kalamata olives, fresh herbs, parm cheese, LONGER rising times, shorter rising times… you cannot mess this up!! Each and every loaf has been perfection. Thank you. I LOVE, LOVE, LOVE this recipe! I find myself preaching to everyone I know about this bread! It’s
Iike I’ve been brainwashed by a cult! Have converted a bunch of friends/strangers. This is the best!!
I bake just about all of our own bread and still have never tried this. Unitl tonight! Wish me luck come morning and thanks for the simple approachable recipe!
love, Darla
I looove this recipe!! So easy! I only use electric oven with bain-marie method and it works! My husband and girls love this bread tol. Thank you for sharing the recipe
Typo in cook time 45 hours instead of 45 minutes
Hi, we made this amazing bread for Sunday breakfast. A bit messy as it leaked out of the plastic wrap and all over the counter but we were able to round it out and get it into the dutch oven. It came out golden, crusty and generally fabulous in spite of looking like a hot mess. The one tsp of added caster sugar offset the salt nicely.
My question is, if adding olives or dates and nuts, would you do so before you let it sit and rise? Do you recommend rolling them (the additives) in a little flour so they don’t draw moisture out of the dough before incorporating?
Many thanks for this brilliant recipe. I’ve been terrified of baking bread and this couldn’t be easier.
I just wanted to thank you for this bread recipe! So easy and so so yummy! Perfect texture and the crust is my favorite part! My girls 7 and 4 yes old could get enough of it.
This recipe originated from Jim Lahey at the Sullivan Street Bakery. You can find this recipe and it’s variations in his book, No-Knead Bread: the Revolutionary No-Work, No-Knead Bread.
This recipe actually came from my Mother-in-law who has been making it for 40 years!
This bread WAS delicious! The only problem I had was getting it out of the Dutch oven. It was stuck but not burned.. Does it have to cool first? Or could I put a little corn meal on the bottom? The next batch, there definitely will be a next batch, I will try adding the buttermilk to give more of a sourdough flavor. Thank you so much for this really easy to prepare bread.
I always put a circle of parchment paper in the bottom. I reuse the paper a couple times, too. No sticking.
Yes like Lesa said- Use some parchment paper :)
I have made this bread about 5 times, with the latest baking right now. It smells heavenly! I had been looking for years for a recipe for crusty bread. They are all labor intensive as far as I was concerned. Spraying with water, lowering or rising the temp during baking. So I was a bit skeptical. I lived in Alaska for many years and had made sourdough bread. Again labor intensive. This reminds me so much of that wonderful sourdough bread. Every time I make it it’s better then the last time. Great recipe!!! I am a bit lazy and do use the mixer to mix ingredients together. I also add 2 teaspoons yeast, and a little more salt. Again ……. Great recipe!!!
I just tried this and I ended up with a runny, gloppy mess!!! What did I do wrong! I put it together yesterday late afternoon so it sat for almost 24 hrs…..had to go to work today. I came home thinking ooooh how nice to have fresh bread and when I turned it out onto the floured surface it was very runny and gloppy and just a mess, I had to throw it away!
Help!
Thanks!
The dough by nature is quite sticky and nothing like normal bread dough. I turn it right onto parchment paper and then use a lot of flour to just barely work it to a round shape.
Maybe you need more flour!
Thanks for the tips, I tried both….used parchment paper and definitely used more flour!!! I turned out wonderful!! So glad I didn’t give up!! Well absolutely be making this again…SOON!
Thanks!
Hiya, made 2 batches already and they are a hit! Was wondering if I could sub some hard apple cider for some of the water?
Thanks!
That would probably be great! I’ve never tried it though…
Ok thanks, I’m just not sure how the carbonation would work with the bread and yeast. I’ll give it a try and let you know how it works out.
Ok, I tried it, I used 12oz of an Angry Orchard Hard Apple cider, no water. Was only a very small hint of the apple flavor. Was still yummy!
Wow… a wonderful recepie… a must try..
I am an amateur baker.. I have a 30ltr oven… my loafs rise beautifully but I mess up wen it goes in oven.. can u guide me bit with which rods to keep ON, top, bottom or both, while baking various varieties, nt only breads.. hw u do it? Also of I use aluminium foil beneath, will temperatures hv to be changed, rather lowered?
I have a four quart Lodge Dutch Oven could I use it for this recipe or would it be a problem?
Thank-you!
That’s what I use. I put parchment paper in the bottom. I bake it for a shorter time, so be sure to check your loaf. It really comes out nice.
Can you advise if you are using a plain oven or fan-forced. If I use a fan-forced oven what temperature should I use. Making dough this afternoon for baking tomorrow. It looks delicious and I can’t wait to try it!
I just used a regular oven :)
Love this recipe! Have made this bread numerous times, but it wasn’t until today that I noticed the Cook Time is given as 45 hours rather than minutes!
Tried this method, unfortunately bread turned out too dry with hard crust that’s hard to chew. Not sure what went wrong?
This bread does have a rather tough crust, but to me, that’s one of its endearing qualities. I find the interior to be quite moist. But this is a bread that should be eaten the day it comes from the oven, or it should be toasted the next day, or maybe used for paninni.
Yes, Jean, I also love crusty artisan breads but this loaf turned out way too dry. Maybe it has to do with Canadian flour which differs from American? Also I have put more water than stated in the recipe as dough seemed to be dry.
The dough does appear rather stiff and dry when first mixed, but it takes on moisture as it sits. I would suggest not adding additional water and see if that helps.
I will definitely try that. Thank you for great advise!
I love this recipe. Quick and easy. I don’t have a dutch oven, so I used a glass pyrex bowl – no parchment paper. Worked out great! The loaves may not have been quite as “artisan” as the pictures above, but we loved it. Since I am essentially a lazy baker, I put the bowl on the stove while it is preheating and just dump it into the dish vs turning it out onto a floured surface. If you don’t like the super crispy crust, then pop it into a zip lock bag after it is just cool to the touch. This is great for everything! Now that I have made this several times with success, I am going to try and experiment with some of the herb/cheese suggestions above. I have also made this recipe using whole wheat flour (the key seems to be 2x the flour to water ratio) and it was honestly the best whole wheat bread I have ever had.
I’m so glad you like it!
I would love to try the whole wheat variety. Did you just use Two Cups of Whole Wheat Flour versus 3 Cups of All Purpose to the 1-1/2 Cups of warm water to make this change? Was everything else the same? salt, yeast, rise, cook temp and time?
You kinda have to slowly add more WW flour to see how much you like without changing the overall texture. I would start with half and half first!
I have never made bread before and was a little hesitant but the recipe looked super easy and I just had to try it. I made this bread a couple of days ago to go with homemade split pea soup and it was AMAZING. My fiancé devoured it and told me I had to make this at least once a week. He said that this bread was a million times better than what his mom makes. I have been commissioned to make this for Thanksgiving dinner in a couple of days. Thank you so much for the recipe!!!! I think after Thanksgiving I am going to experiment with adding other ingredients to the bread. Would you recommend adding cheese, herbs, dried fruits, ect, to the batter right as it is made or should they be added after it has sat the 12-18 hours? Thank you so much again.
I would had the herbs or cheese, etc., when I first mix the dough.
A friend made this bread for Thanksgiving and we all devoured it! So, I am trying my hand at it. I only have a cast iron dutch oven…hope it turns ok. Thank you!
Cast iron Dutch oven is exactly what I use!
I made this bread this morning and it’s delicious. I added 1/4 cup of honey to the mix so the bread has a mildly sweet taste and gorgeous color. I had trouble with the shape though so mine turned out more like a flatter oval :) My LeCrueset was totally fine. Thank you for the great recipe. I plan to add this to my go-to list.
Thank you so much for this recipe. I have made it quite a few times now and it turns out perfectly each time. I even forgot to put the lid on my dutch oven once (oops) and the bread still turned out great. I make the dough before work, let it rise all day and I bake it in time for dinner. This recipe has really been a life changer for me because I can have homemade delicious bread even during a busy work week. Thank you.
Hi, Tried the recipe today and the bread looked exactly like the one posted, however, the inside had a clump of dough that actually crumbled into a powder when cool. What did I do wrong. I made the dough last night, placed it in a glass bowl and covered with plastic wrap, carefully put it on a well floured bread bowl and shaped it into a ball then covered it again with plastic wrap while my cast iron dutch oven cured in the oven for 30 minutes. Cooked it for 30 minutes covered then removed the cover for additional 15 minutes cooking. The only thing I think might have caused the problem is my oven temperature was off. I have a temperature gauge and it looked like it cooks at about 10 degrees below what I set it at. If you think this is the problem I can increase the setting to make up for the difference. Please let me know what you think I did wrong. BTW It also seemed more dense than yours looks. Can’t wait to try again, what a fun recipe! Thank you so much
I sounds to me as if your flour didn’t get evenly mixed into the water at the outset. There must have been a little “bubble” of flour that like a capsule throughout your procedure, even refusing to blend in and bake! Otherwise, you obviously did everything right. Don’t be discouraged; just mix the flour/water/salt a little more next time.
Thank you so much Jean, I think you are right about what went wrong. Actually, I just thought about that possibility before I opened your response. I think I used too small of a bowl to begin with because it was hard to mix and it raised to the top by this morning and I think it would have gotten bigger if the plastic wrap didn’t stop it. Your response makes so much sense and I am going to make it again thanks to your help. Happy baking to you too :}
Diane, You might try using a whisk to mix and aerate the flour/salt before you stir in the water. Also, you might try using a fork for the first few stirs after adding the water, then continue the stirring with a spoon. I’ve used a whisk to stir it after adding the water, too, but the dough clung to the whisk and was a mess to “disentangle.”
I agree with Jean :) Even though the dough is scraggly and no knead you should make sure everything is combined properly :)
Thank you so much ladies, I love the recipe. I will be making another loaf really soon and I totally agree with you, I just didn’t mix it well enough. My first mistake was using a bowl that was way to small to begin with. I am totally confident that the next one will not only look great but will also taste great too. Again THANK YOU for your input, I am always happy to get such positive feedback.
Hi,
Can I make this bread with Gluten Free all purpose flour ? The brand I have is Baker Josef.and I could not find any recipe for this brand of gluten free. Do I need to modify your recipe when I use gluten free all purpose flour?
Greatly appreciated.
making this no-knead bread for the first time. doubled the yeast on the advice of a friend who’d made it a standard in his kitchen.
love french breads so will be probably going toward some sugar in the mix.
i am concerned as my country kitchen is cold (45*F) so will be rising in a ‘warm’ oven. hoping not to kill yeast.
wondering if anyone uses butter on the crust during the browning phase or will this stifle proper crusting??
well, i was right, the kitchen was too cold. the plastic ‘deflated’ and there was no rise to the bread.
i put 6 votive candles and a thermometer in the oven today and i’m hoping that will salvage the loaf.
otherwise it’s off to the store for more yeast.
i am NOT giving up.
amazing that i can screw up a No-Knead bread…
I’ve put a pan of warm water on the shelf beneath the rising cough in the oven. I’ve also heated a Pyrex cup in the microwave, then placed the rising dough in the microwave with the cup of hot water. Both methods were for dough I wanted to rise in a jiffy, though, not for this bread recipe. I hope the votive candle method works. It’s a clever idea. I like your refusal to give up!
well, after an hour the candles are holding a steady 70*F, so if anything is going to happen with that batch, this is it.
BUT, i’ve got a sneaking suspicion i’m off to the grocery for more yeast…
at least i know how to get it to rise now…
Excellent! Your votive candle method is working. Trust me, the effort you’ve put into this endeavor is well worth it. The bread is delicious. I’ve been known to let the dough rise longer than the recipe calls for, by the way. If it gets ready to escape the bowl, I don’t think it would do any harm to stir it down and let it rise again.
well, nothing happened with the old dough, so it was off to the grocery. got QUICK RISING yeast this time. should work. AND used THREE packets so maybe we can get a rise out of this (ALL puns intended) be i crash tonite.
warming with jean’s suggestion of using the microwave oven, combined with 4 votive candles. coming to temp as i type. will know if that’s correct or not pretty soon.
the candles don’t work for real long, maybe two hours, so i will have to come up with some other source for thru-the-nite… thinking chicken lamp over the bowl or chicken lite in the oven (probably the safest…
well the votive candles in the microwave didn’t work: not enuf oxygen… WWT???
trying a 100W bulb in the regular oven but closed that got to 130*F pretty fast. Got it cooled but the yeast may be dead on this run too…
well, at least i got yeast (sorry) and can try again…
i’m german. i’m GOING to figure this out…
Yes, You surely will figure it out! One thing to keep in mind is that the dough rises VERY slowly. You might not even see a change in it for a few hours. Then you’ll notice a bubble here and there. Then more bubbles. Then you’ll realize the dough is starting to climb up the bowl. (By the way, don’t grease the bowl.) I often mix the dough in late afternoon, and by the next morning the dough is very bubbly and is peeking at me, under the Saran Wrap, from near the top of the bowl. I usually don’t bake the bread until that afternoon. So the entire procedure can take 24 hours. But boy, is it worth it!
ok, maybe i’ll wait to tomorrow morning to start baking…
i AM buying more flour and yeast tho…
finding an ‘easy’ bread recipe is addicting…
I thought my kitchen was too cool for the bread but I had seen something on line by King Arthur that suggested letting the dough rise in a closed oven with the oven light on. It worked like a charm.
Ha! That’s rising dough, not rising cough.
don’t know WHAT is going on here. put TWO mixes in the 85*F oven for the nite and no change. do not understand. the test today is going to be with bottled water instead of the high calcium well water…
another question: on mixes 2 and 3 i put the yeast into the water first, then mixed both into the flour and salt. I notice the recipe mixes all dry first, then adds water, it’s hard for me to believe it would make a difference, but on #4 i will mix all dry first. when i did this on #1, i DID get response…
FIANLLY!!! YEAH, got a rise!! (sorry, i couldn’t resist…It’s an old fishing pun…)
THINK my problem was dissolving the yeast into the water first, but i did change the water too.
So, on #6 loaf, i’m adding sugar but nothing else.
mas luego.
going to bake one tonite, the other in the morning tomorrow (knock on wood, assuming it rises…)
I shouldn’t think it would make a difference if you add the yeast to the water rather than to the dry ingredients.
After many failures with adding the yeast to the dry ingredients, now I always dissolve the yeast in a small amount of the water, which I warm slightly ( no more than 115 degrees.) I sprinkle 1 tsp. of sugar over the yeast. In a few minutes, when I see the yeast starting to foam, I add this to the remaining liquids in the recipes before adding the mixture to the dry ingredients. Using this method I know if the yeast is working before adding it to the other ingredients. This is better than finding out later than the yeast was not activated.
Hope this helps.
Oops. I thought I’d typed,” I should think it would NOT make a difference….” Sorry about that!
Just be sure to let the dough ferment a good amount of time. That’s where the delicious flavor comes in!
yes, i decided to let both loaves go to tomorrow…
can hardly wait for breakfast, then sandwiches for lunch.
and bread with dinner…
Atkins is rolling over in his grave…
Adkins
“This is better than finding out later than the yeast was not activated.”
With ‘fresh’ yeast, what % of the time doe you find it not to activate??
Sorry, I am familiar only with DRY yeast, which is typical in the U.S. much more so than Fresh yeast.
Recipes specifying INSTANT yeast which is different than ACTIVE DRY yeast, typically say not to dissolve or proof the yeast (which is typical when using ACTIVE DRY yeast) but to add the INSTANT yeast in with the dry ingredients.
I have had more success- especially with gluten free breads- to proof the yeast when using either Instant or Active Dry yeasts. I have wasted too many ingredients when the finished dough does not rise because the yeast did not activate; better to make sure the yeast is working before adding the expensive ingredients.
When a recipe says, Instant Yeast, one can substitute Active Dry yeast, but increase the yeast by 25% because Instant yeast has a bit more rising ability.than Active Dry yeast; so for 1 tsp. Instant yeast, one would use 1 1/4 tsp. of Active Dry yeast.
It’s actually a new thing that Active and Instant Yeast are essentially the same thing. Therefore there is no need to dissolve the yeast in water ahead of time!
FINALLY!!!
got a clean rise out of it.
i REALLY goosed the sugar while holding the yeast constant.
premixed the active dry yeast. used a full TABLESPOON.
used AP flour
added 1/3c of white sugar and 1/3c of honey…
dough looks like i would expect and very similar to the pictures above which none of the other attempts have (8 now).
took 7 hours even so.
i was rising in an 85* to 90* area (oven with 100W bulb inside)
i briefly lost faith in this recipe and tried a similar artisan recipe, but with the same issues.
still not sure where my problem came from,
BUT NOW I DON’T CARE, DAMMIT!!!
I really appreciate all who have commented and as i experiment, i will post.
this is a great recipe.
it is the end of preservative bread for me.
now, where are my sesame seeds…
going to try another one tonite (nice to be able experiment so cheaply…) b4 i start changing flours.
I’m just a mere male so I used 2 TSP yeast by mistake. I added a heaping tablespoon of salad herbs for flavor. Dough ball seemed fully developed in 4 hours. I had it in the oven by 8 hours. No Dutch Oven so I used a 3 quart/liter covered glass casserole.
Loaf came out looking just like your pictures. Could have used 2 tbl spoons of spices. GREAT FLAVOR AND TEXTURE.
this may be my problem. i’ve been sticking to 1tsb of yeast. i’m also thinking that photography is in play also as the loaf in the picture has a pretty ‘flat’ slice, i.e. only 1″ or so high.
how high are other people loaves?? i’m trying to get 3-4″ and maybe no one else is either???
so far i’ve loved the flavor and texture, but just not getting that 4″ load that others seem to be getting.
thanks for the 2T note, Fred. i’ll try it…
well, i figured out what i was doing ‘wrong’. i had to change the pan. when i was in my cast iron, the loaf could spread out on it’s second faux rise, while the dough came up to baking temps.
eventually, i put the entire recipe into a regular loaf glass pan, let it rise under a 100W bulb for a second time while the oven heated. it rose nicely to fill the form and then rose a bit more as it was popped into oven. wonderful 4″ loaves. tastes wonderful.
i also upped the yeast as had Fred and that got the first rise to 1 hr in a 90F oven space and the second rise to 15 mins, so it’s not an overnite bread anymore. raves on the first three gifts.
tomorrow i experiment with using sour milk instead of water. i’m now using 4c UNBLEACHED flour and 2c ‘water’ with 3Ts of honey in it when i start the yeast. Now, i’ll move to 1/2 water to start the yeast and mix it with 1-1/2c of sour milk…
cheers and thanks for all you comments. they were very helpful.
should mention that if i don’t put the loaf pan into the cast iron dutch, i don’t get that same ‘crackly’ crust…
Thanks for the recipe!!! This looks amazing!
I do have a question, have you tried cooking this in a traditional Dutch oven? If so how did it turn out? did it stick to the pan or have any other problems? All I have are traditional ovens and haven’t baked any bread yet.
Thanks for taking the time to write and post this!
I’m trying this today, since I’ve got a craving for home-baked bread but reeeeally don’t like the kneading. I only had fresh yeast, so I’m using about 7-8 grams, which should be equivalent to the stated dry yeast amounts. I also have nothing with lid that is oven safe/fits into my oven, so I’m going to try using a cake form, put it onto a cookie sheet and use the removable bottom as a lid. Do you think it will turn out ok? :)
OK so it worked! The crust is perfect, the inside soft, the taste delicious. Thanks for the recipe, I will definitely make this a lot!
This is a fantastic recipe, and I have been using it (sometimes subbing out some of the flour for whole wheat) for a year or so. During cold weather, our house is REALLY cold…. and to get it to rise I have been known to put it atop the clothes dryer…. or to put it with a a hot water bottle and a towel around it if it is very, very cold in our house. Latter is low tech, but works beautifully….
I LOVE this recipe! I made it as a side for a chili cookoff at my work and totally stole the show! it’s a major crowd pleaser! Thanks for the recipe!
This was my first try at no-knead bread baked in a covered pan. (I used a cast iron pan that’s technically a chicken fryer, but that we use as a dutch oven.)
The bread turned out fine: the end slices had the large, irregular holes, but the center of the loaf had a tighter crumb, and seemed a little wet and heavy. Did I just need to bake it longer? (The internal temperature was a little over 200 degrees F.)
Also: does the top of the dough need to be slashed before baking, as with other bread recipes?
Thanks. I’m looking forward to trying again.
Yes it sounds like it was a little underbaked :0
I made this dough yesterday at 2pm and put it up on top of my refridge until I cooked it at 1pm today…
The dough was VERY wet and I had to use a lot of flour to form the ball, but the baked round actually came out looking just like your photos and the taste is FABulous…
Thank you for sharing this recipe. As a first time in 30 years bread baker, this No Knead Artisan Bread recipe is quite do-able and the results so satisfying…❤️
I just mixed all the ingredients, and the dough looks extremely dry with lots of flour left at the bottom. Is this something you call “shaggy dough”?
No I would say your dough needs a little more mixing. It should look like the picture above!
I love this recipe! simple to make and my family loves it. … my daughter is getting married September 13, outside at a beautiful covered bridge. I am doing all the cooking for a appetizer and dessert buffet. I would like to make 5 or 6 varieties of this but I’m not sure of what spices to use…. any ideas?
You could try rosemary/thyme, you could do jalapeno & cheddar, sun dried tomatoes, olives, really anything!
Hi Audra, do you think one could make this with spelt flour or stoneground wholemeal flour, or is using all purpose white flour an essential part of the recipe? Thanks!
I made this bread so many times and it turned out great! I made it in an oval 3qt dutch oven.
Did you ever try to double the recipe? Would baking time change? I read a similar recipe with double the ingredients and baking time was 40 min covered, 15 min uncovered. I would like to double this recipe and bake it in a 5qt cast iron pan I’m just confused with the baking time. Do you think that 40 min covered and 15 min uncovered would work?
Thank you!
To answer your questions about the gluten free version …I made it & it came out FANTASTIC!! Seriously!! I used my 1c cup4cup whole grain gf flour & 1c Pamala’s all purp gf flour & 1c cup4cup all purp gf flour (only cause I wad running out of almost all my flours so I used what I had). I had to use a bit more water & a bit more yeast (as gf flours have a tendency to be heavier & more absorbent) & after eating it which was super delicious but I would put a tsp of sugar in next time to cut the yeasty taste (which was a bit reminiscent of sourdough so not at all bad). But HAZZAH I have super delicious gf bread.
Thank you so much for this recipe! I have tried making crusted bread so many times but it has always been dense. This one come out so well with beautiful air pockets. To top it all it was so easy without the kneading! Definitely making this again with some fresh herbs *drool*
came*
came*
Click on the license title below for details.
I really want to make this recipe. Been searching for an easy one for a while and all the other recipes I’ve tried have made my sourdough bread seem too dense. I’m using starter yeast. I’m trying to figure out how much to substitute for the dry yeast you use. Do you know? Either way, I’ll figure it out and make it.
I make this bread so often it’s crazy! Every time I make it everyone loves it. I do add the 2 tsp. of salt as it gives it more flavor. A lot of times I will roast 2 heads of garlic and dump the dough out on a floured surface, place the roasted garlic on the dough and then kind of roll it up and dump it in the hot bowl. It is AMAZING!!!