Banana Pudding Layer Cake
When your first-born turns 5 and is a total foodie, you do everything you can to make his birthday cake dreams come true!
Hugo tired my Homemade Banana Pudding when I made it over Christmas, and promptly declared it was “good as heck,” and that it was the treat he wanted for his birthday.
After a while though he decided he really needed a birthday cake, and so I suggested I figure out a way to make a Banana Pudding Layer Cake for him. He loved the idea and I got to planning.
It’s been years since I’ve made one of the Milk Bar-style cakes and I knew I wanted to try this fun method again. Listen- this cake has lots of steps, but I promise it’s not hard if you do one step 3/4 days before you want to make the cake, one the next day, and then assemble the whole thing a day before. Break it up and it’s totally doable!
Here is how it works:
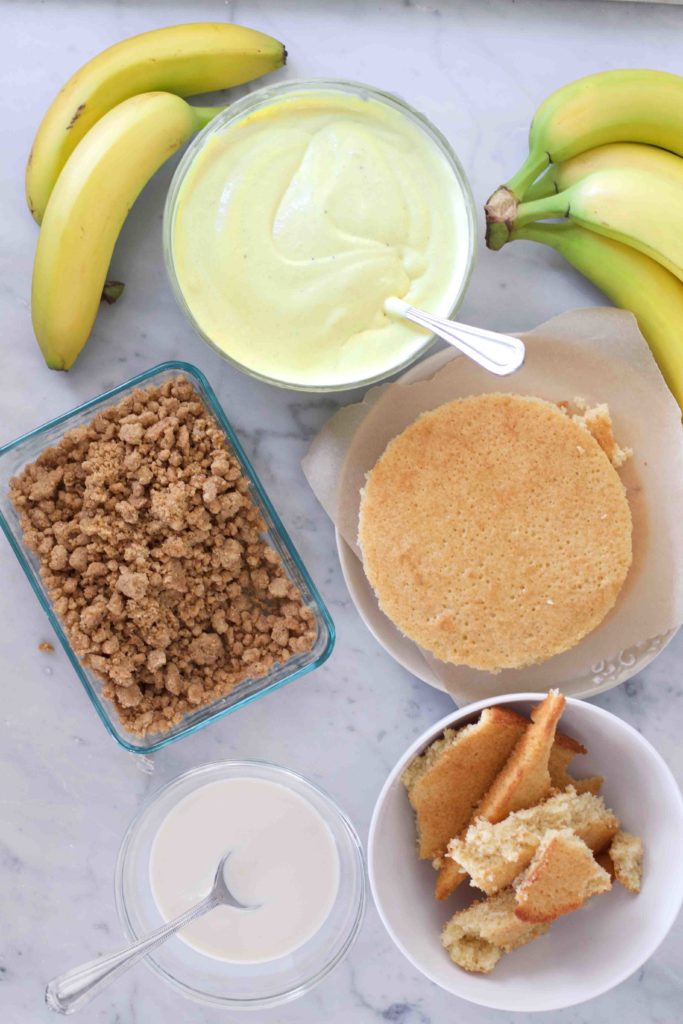
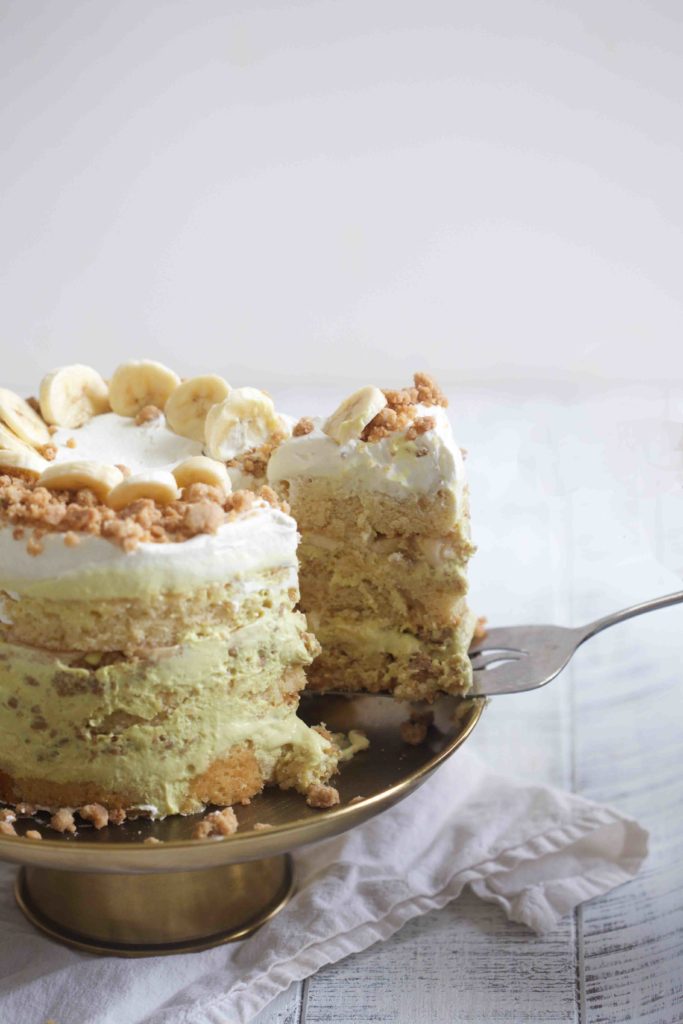
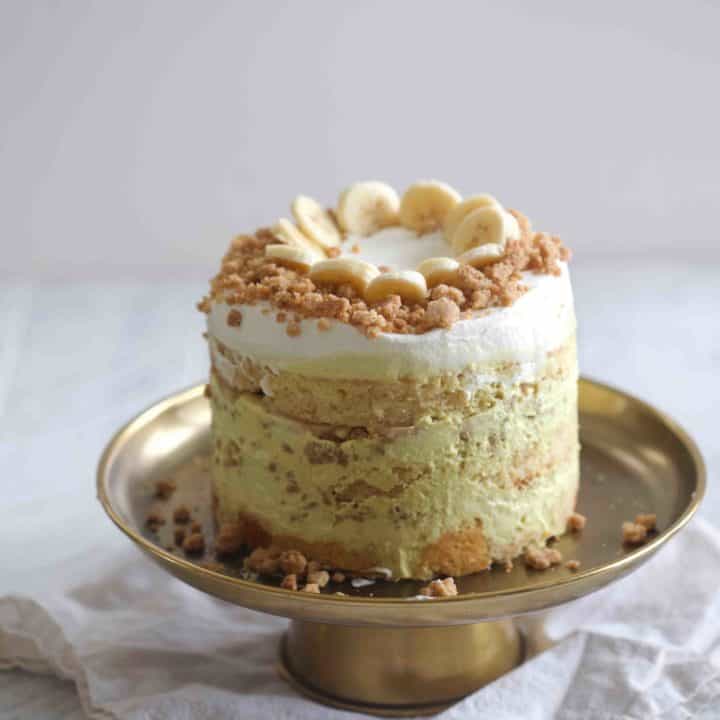
Make a base cake in a sheet pan and stamp out layers using a cake ring
Make a liquid “soak” (In my case vanilla milk soak,)
Add a crunchy-textured filling- I made vanilla wafer crunch.
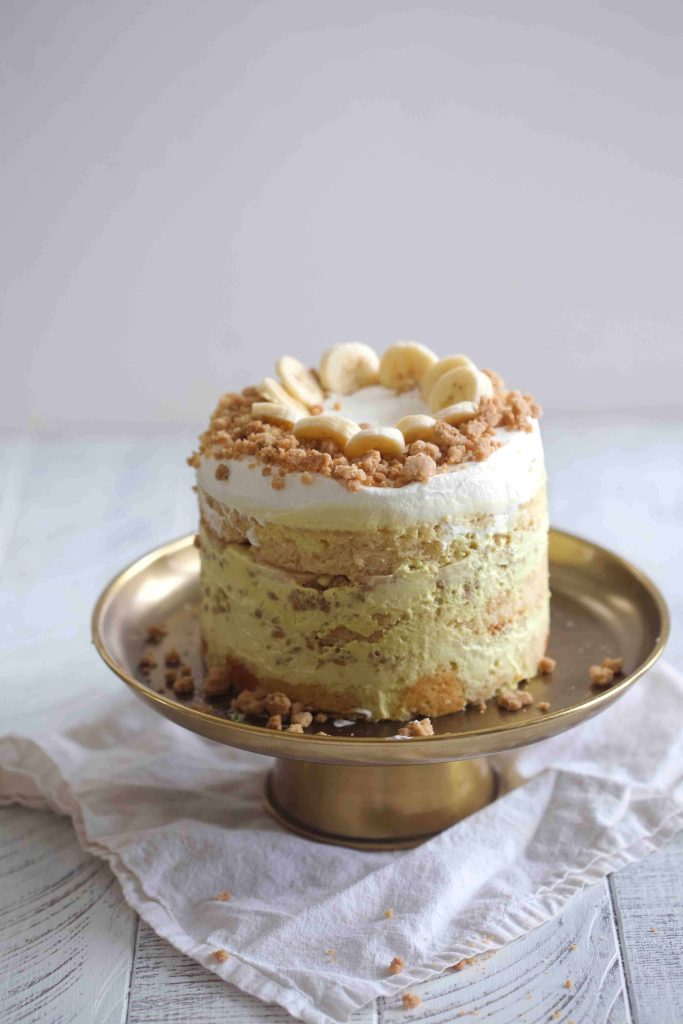
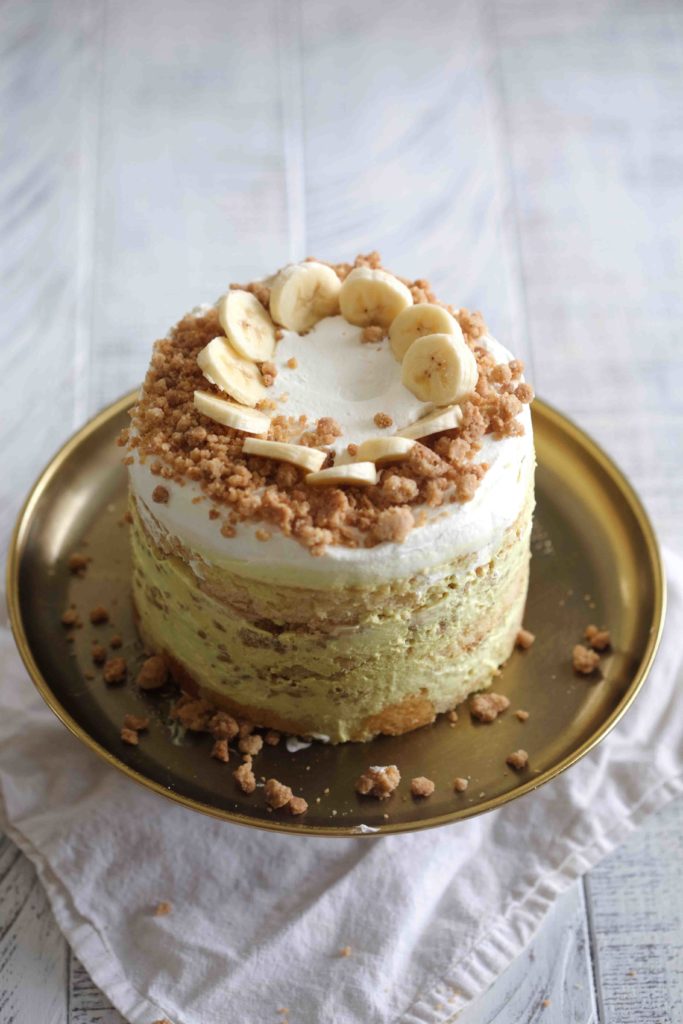
Add some creamy fillings or frostings, I did banana cream and banana slices
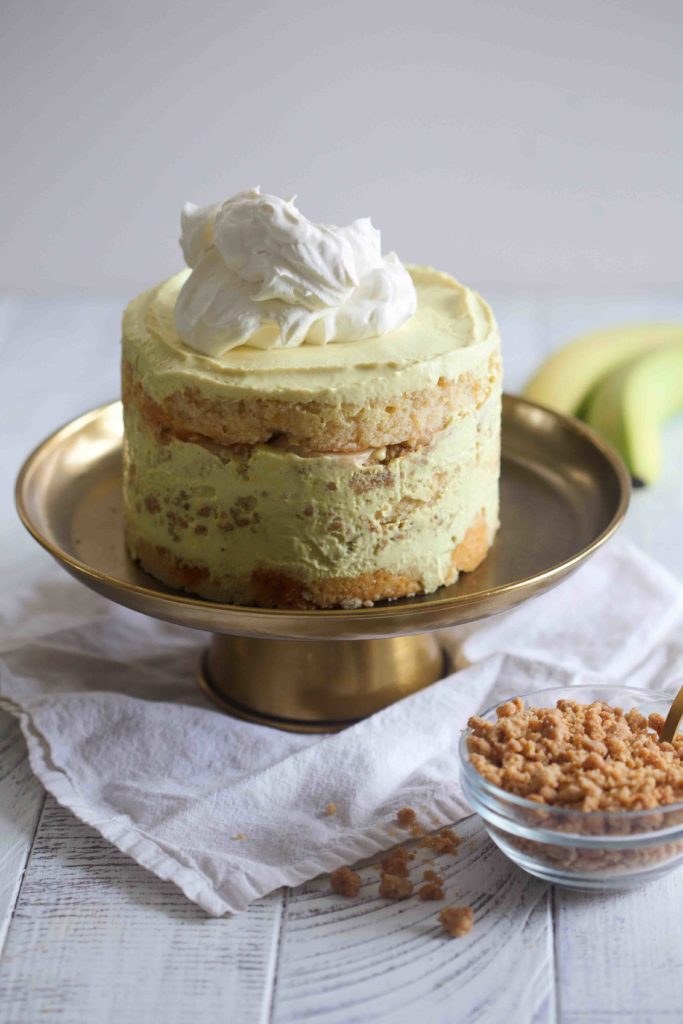
Layer, fill and frost! (I topped this with whipped cream and fresh bananas!)
The end result: SO GOOD. We had a few of Hugo’s friends and their Moms over for a birthday playdate and everyone was just oohing and ahhing over this.
The cake was so moist from the milk soak, the crunch was a bit salty and the perfect texture, and the super banana-y cream was velvety and full of flavor. This tasted just like my favorite banana pudding but in cake form.
Most importantly- the birthday boy was thrilled and that made me so happy. Next up- Fiona’s 3rd birthday is in March and she has requested “A pink cake Mama because I love pink so much!” So I’ll get on planning that next!
Interested in where to find some of the supplies used to make this type of cake?
This 6 inch cake ring is essential for cutting the cake into rounds and shaping it. Also, Acetate strips are used to line the inside of the ring to give the sides support while it sets. Both can be found on Amazon!
What do you think? Would you give this cake a try??
Banana Pudding Layer Cake
This cake may seem complicated, but I promise it's totally doable with a bit of planning. I recommend starting 3-4 days before you’ll need to serve the cake: make the banana cream one day, the crunch the next, then the cake itself, and finally assemble it all together and freeze overnight.
Ingredients
For the banana cream:
- About two very very ripe bananas (brown is best!) (225g)
- 1/3 cup heavy cream (75g)
- 1/4 cup milk (55g)
- 1/2 cup sugar (100 g)
- 2 tablespoons cornstarch (25g)
- 1/2 teaspoon kosher salt (2g)
- 3 egg yolks
- 1 teaspoon powdered gelatin
- 3 tablespoon butter (40 g)
- 1/4 teaspoon turmeric*
- 3/4 heavy cream (160 g)
- 1/2 cup powdered sugar (80 g)
Vanilla wafer crunch:
- 1 cup vanilla wafer crumbs** (100g)
- 1/2 cup flour (20g)
- 1/2 cup sugar (50g)
- 7 tablespoons butter, melted (100g) ***
Vanilla cake:
- 1 stick of butter at room temperature (115g)
- 1 1/4 cup granualted sugar (250g)
- 1/4 cup tightly packed brown sugar (60 g)
- 3 eggs, room temperature
- 1/2 cup buttermilk (110g)
- 1/2 cup vegetable oil (75g)
- 1 tablespoon vanilla extract (12 g)
- 1 1/2 cups all purpose flour (185g)
- 1 teaspoon baking powder (4g)
- 1 teaspoon salt (4 g)
Milk soak:
- 1/2 cup milk
- 1 teaspoon vanilla extract
For topping:
- 2 fresh bananas for layers and topping
- 1/2 cup whipping cream
- 1 tablespoon powdered sugar
Instructions
First make the banana cream:
1-Combine the two bananas, heavy cream, milk in a blender and pureé until totally smooth (you could also use an immersion blender or food processor.)
2- Once the mixture is completely smooth, add the white sugar, cornstarch, salt, and egg yolks, and continue to blend until smooth. Pour the mixture into a medium saucepan, wiping the blender clean.
3- Bloom 1 tablespoon powdered gelatin by sprinkling it evenly across the surface of a small bowl filled with 2 tablespoons of cold water. The gelatin is bloomed when it is soft, about 2 minutes.
4- Whisk the pudding mixture over medium-low heat, whisking constantly. As the banana mixture heats up, it will thicken. Bring to a boil and, once it's at boiling point, continue to whisk vigorously for about 2 minutes to fully cook out the starch. It will be thick and pale.
5-Transfer the contents of the pan back into your blender, food processor or bowl with immersion blender. Add the bloomed gelatin, and 3 tablespoons butter and blend until the mixture is smooth and even. Add the turmeric and if desired, add more, a little at a time until the desired color is reached. (taste after every addition to make sure the flavor is masked.)
6-Transfer the banana mixture to a heatproof container, and let cool in the fridge for as long as it takes to cool completely, about 30 to 60 minutes.
7-When the banana mixture has cooled, make whipped cream by combining 3/4 cup heavy cream with 1/2 cup powdered sugar. Use a hand mixer or whisk by hand until medium-soft peaks form.
8-Add the cold banana mixture to the whipped cream and slowly whisk until evenly colored and homogenous — the mixture should turn into a pale yellow. Store in the fridge well-covered for up to a week, until ready to assemble the cake.
For the Vanilla Wafer Crunch:
1- Preheat oven to 275F.
2-In a medium-sized bowl, combine the wafer crumbs, flour, sugar, and melted butter. Combine until wet and well-mixed.
3- Spread mixture on a parchment or sil-pat lined cookie sheet, and bake for 20 minutes, breaking up some of the crumbs halfway though. Afer 20 minutes the crunch should look a bit toasted, smelly buttery, but still be soft. (It will harden as it cools and get crunchy.)
4-After cooling the crunch can be stored in an air-tight container for up to 1 week.
For the Vanilla Cake:
1-Preheat oven to 350°F. Butter and line a quarter sheet pan with parchment paper or a silicone baking mat.
2-Combine the butter and sugars in the bowl of a stand mixer fitted with the paddle attachment and cream together on medium-high for 2 to 3 minutes. Scrape down the sides of the bowl, add the eggs, and mix on medium-high again for 2 to 3 minutes. Scrape down the sides of the bowl once more.
3-On low speed, stream in the buttermilk, oil, and vanilla. Increase the mixer speed to medium-high and paddle for 4 to 6 minutes, until the mixture is practically white, twice the size of your original fluffy butter-and-sugar mixture, and completely homogeneous. Don’t rush the process. You’re basically forcing too much liquid into an already fatty mixture that doesn’t want to make room for the liquid. Stop the mixer and scrape down the sides of the bowl.
4-On very low speed, add the flour, baking powder, and salt. Mix for 45 to 60 seconds, just until your batter comes together and any remnants of dry ingredients have been incorporated.
5-Scrape down the sides of the bowl. If you see any lumps of cake flour in there while you’re scraping, mix for another 45 seconds.
6-Spread the cake batter in an even layer in the pan. Give the bottom of your sheet pan a tap on the countertop to even out the layer.
7-Bake for 30 to 35 minutes or until puffed and doubled in size and the center is set. When gently poked with your finger, the cake should bounce back slightly.
8-Remove from oven and cool on a wire rack. Stored in the fridge or freezer, wrapped in plastic wrap, for up to 5 days.
For the milk soak:
Whisk together the milk and vanilla extract right before assembling the cake
To assemble cake:
1-Put a piece of parchment or a silpat on the counter. Invert the cake onto it and peel off the parchment or silpat from the bottom of the cake. Use a 6-inch cake ring to stamp out 2 circles from the cake. These are your top 2 cake layers. The remaining cake "scrap" will come together to form the bottom layer.
Layer 1 the bottom:
2- Clean the cake ring and place it in the center o fa sheet pan lined with clean parchment or a Silpat. Use 1 strip of acetate to line the inside of the cake ring and tape it together on the outside.
3-Put the cake scraps inside the ring and use the back of your hand to tamp the scraps together into a flat even layer
4- Dunk a pastry brush into the vanilla-milk and give the layer of cake a good, healthy bath of 1/3 of the milk.
5- Use the back of a spoon to spread 1/3 of the banana cream in an even layer over the cake.
6-Sprinkle 1/3 of the crunch over the banana cream, use the back of your hand to anchor them in place.
Layer 2-
7- With your index finger, gently tuck the second strip of acetate between the cake ring and the top 1/4 inch of the first strip of acetate, so that you have a clear ring of acetate 5-6 inches tall- high enough to support the height of the finished cake. Set a cake round on top of the crunch and repeat by soaking the cake, adding banana cream, and then crunch
8-Add a layer of thinly sliced bananas, then add the 3rd cake layer.
9- Soak the top cake layer, top with the rest of the banana cream, and wrap the cake with plastic wrap (just to keep the top covered.) Freeze for a minimum of 12 hours to set the cake and filing. It will keep in the freezer for up to 2 weeks.
10- At least 3 hours before serving, pull the sheet pan out of the freezer and pop the cak eout the the cake ring. Peel on the acetate and transfer cake to a platter or cake stand. Let it defrost in the fridge for at least 3 hours.
11- Before serving, whip up the cream and powdered sugar until stiff peaks form. spread it on the top of the cake along with the remaining crunch and some banana slices, if desired.
Notes
*The Milk Bar recipe calls for you to color the banana cream with a ton of yellow food coloring, but especially since this was for a child, I used turmeric instead! It did the job really well and I couldn't taste it at all, you may use yellow food coloring though if you'd prefer.
**I love the Trader Joe's Very Vanilla Wafers. They are flavored with real vanilla beans and are more authentically vanilla than the Nilla wafer brand. Whatever you have available is fine for this though.
***I used salted butter here to give the crunch a salty taste, but you could use either and add a pinch of salt if using unsalted butter.
Recipe adapted from different parts of the Momofuku Milk Bar Cookbook by Christina Tosi
the cake recipe you suggested is really great thanks for sharing.
Banana cream pie or pudding have never been my favorites, but this cake may change all that! It looks and sounds so yummy…
THESE KIDS! Remy is requesting a green cake (three months in advance, btw). Not sure what I’m going to do there…kind of just hoping she changes her mind! lol. This cake is a masterpiece!!
Hugo wins all the “i have the best mom who made me the best birthday cake” awards. OHEMGEE. This cake looks so so so delicious-such a genius and creative idea!
May I know what is wafer crumb? It’s Malaysia here. I’m bot familiar with it. Where can I find it? Could you help?
May I know what is wafer crumb? It’s Malaysia here. I’m bot familiar with it. Where can I find it? Could you help?
I’m sure she’s referring to vanilla wafers
( cookies) crushed, into crumbs.
I’m your directions you said 2tbsp of gelatin kinda ruined my entire banana cream
1 tablespoon sorry for the confusion
In***
And is there anyway I could fix this?
your ingredient list for the pudding says 1 tsp of gelatin, but the instructions say to bloom a tablespoon. Which measurement should it be?
Thanks for sharing such a delicious banana pudding layer cake recipe. Will try this recipe.
Regards
Chefbakers
such a nice recipe of banana cake
I usually bake using weight measurements and the weight measurements you have in parenthesis for the wafer crunch do not look correct (based on the volume measurements). I just wanted to double check those and the rest of the measurements before I bake this cake!
The problem I had was that in your ingredients you said 1 teaspoon of gelatin. However. In you directions you suggest 1 tablespoon which messed up the banana cream. I’m still unclear what it should be??
Such a nice recipe of banana cake
Did anyone ever get an answer to the 1 tsp or 1 TBS of gelatin? Could split the difference and just do 1 1/2 tsp but I would prefer to know for sure. Too much gelatin in anything makes it rubber.
Hi- it’s 1 teaspoon of gelatin
I made this cake this week for my sister’s birthday. The only thing I changed from the recipe was making my own vanilla wafers, because I figured if I was already going through all the other work, I might as well add one more small thing. Everything was a success! Thank you for holding my hand through my first layer cake, and for making it such a tasty and easy-to-follow first go at that.
Well done! Thank you for your comment!
Audra, do you have recommendations for how many times I’d need to multiply this recipe if I want to adapt it to make 36 cupcakes? I was thinking of coring out the center of the baked cupcake for the banana cream, then putting the whipped topping and nilla wafer crumb on top.
Hi! I think you could make the cake recipe as written for 36 cakes. If you try this version please let me know how they turn out! I also do have Banana Pudding Cupcakes on my blog if you just wanted to try those :)
i forgot to come back and update you! (i’m on your blog now looking to see if you have a birthday layer cake lol)
the recipe made a little over 3 dozen, if i remember correctly. they were incredibly tender and very popular at the neighborhood barbecue!