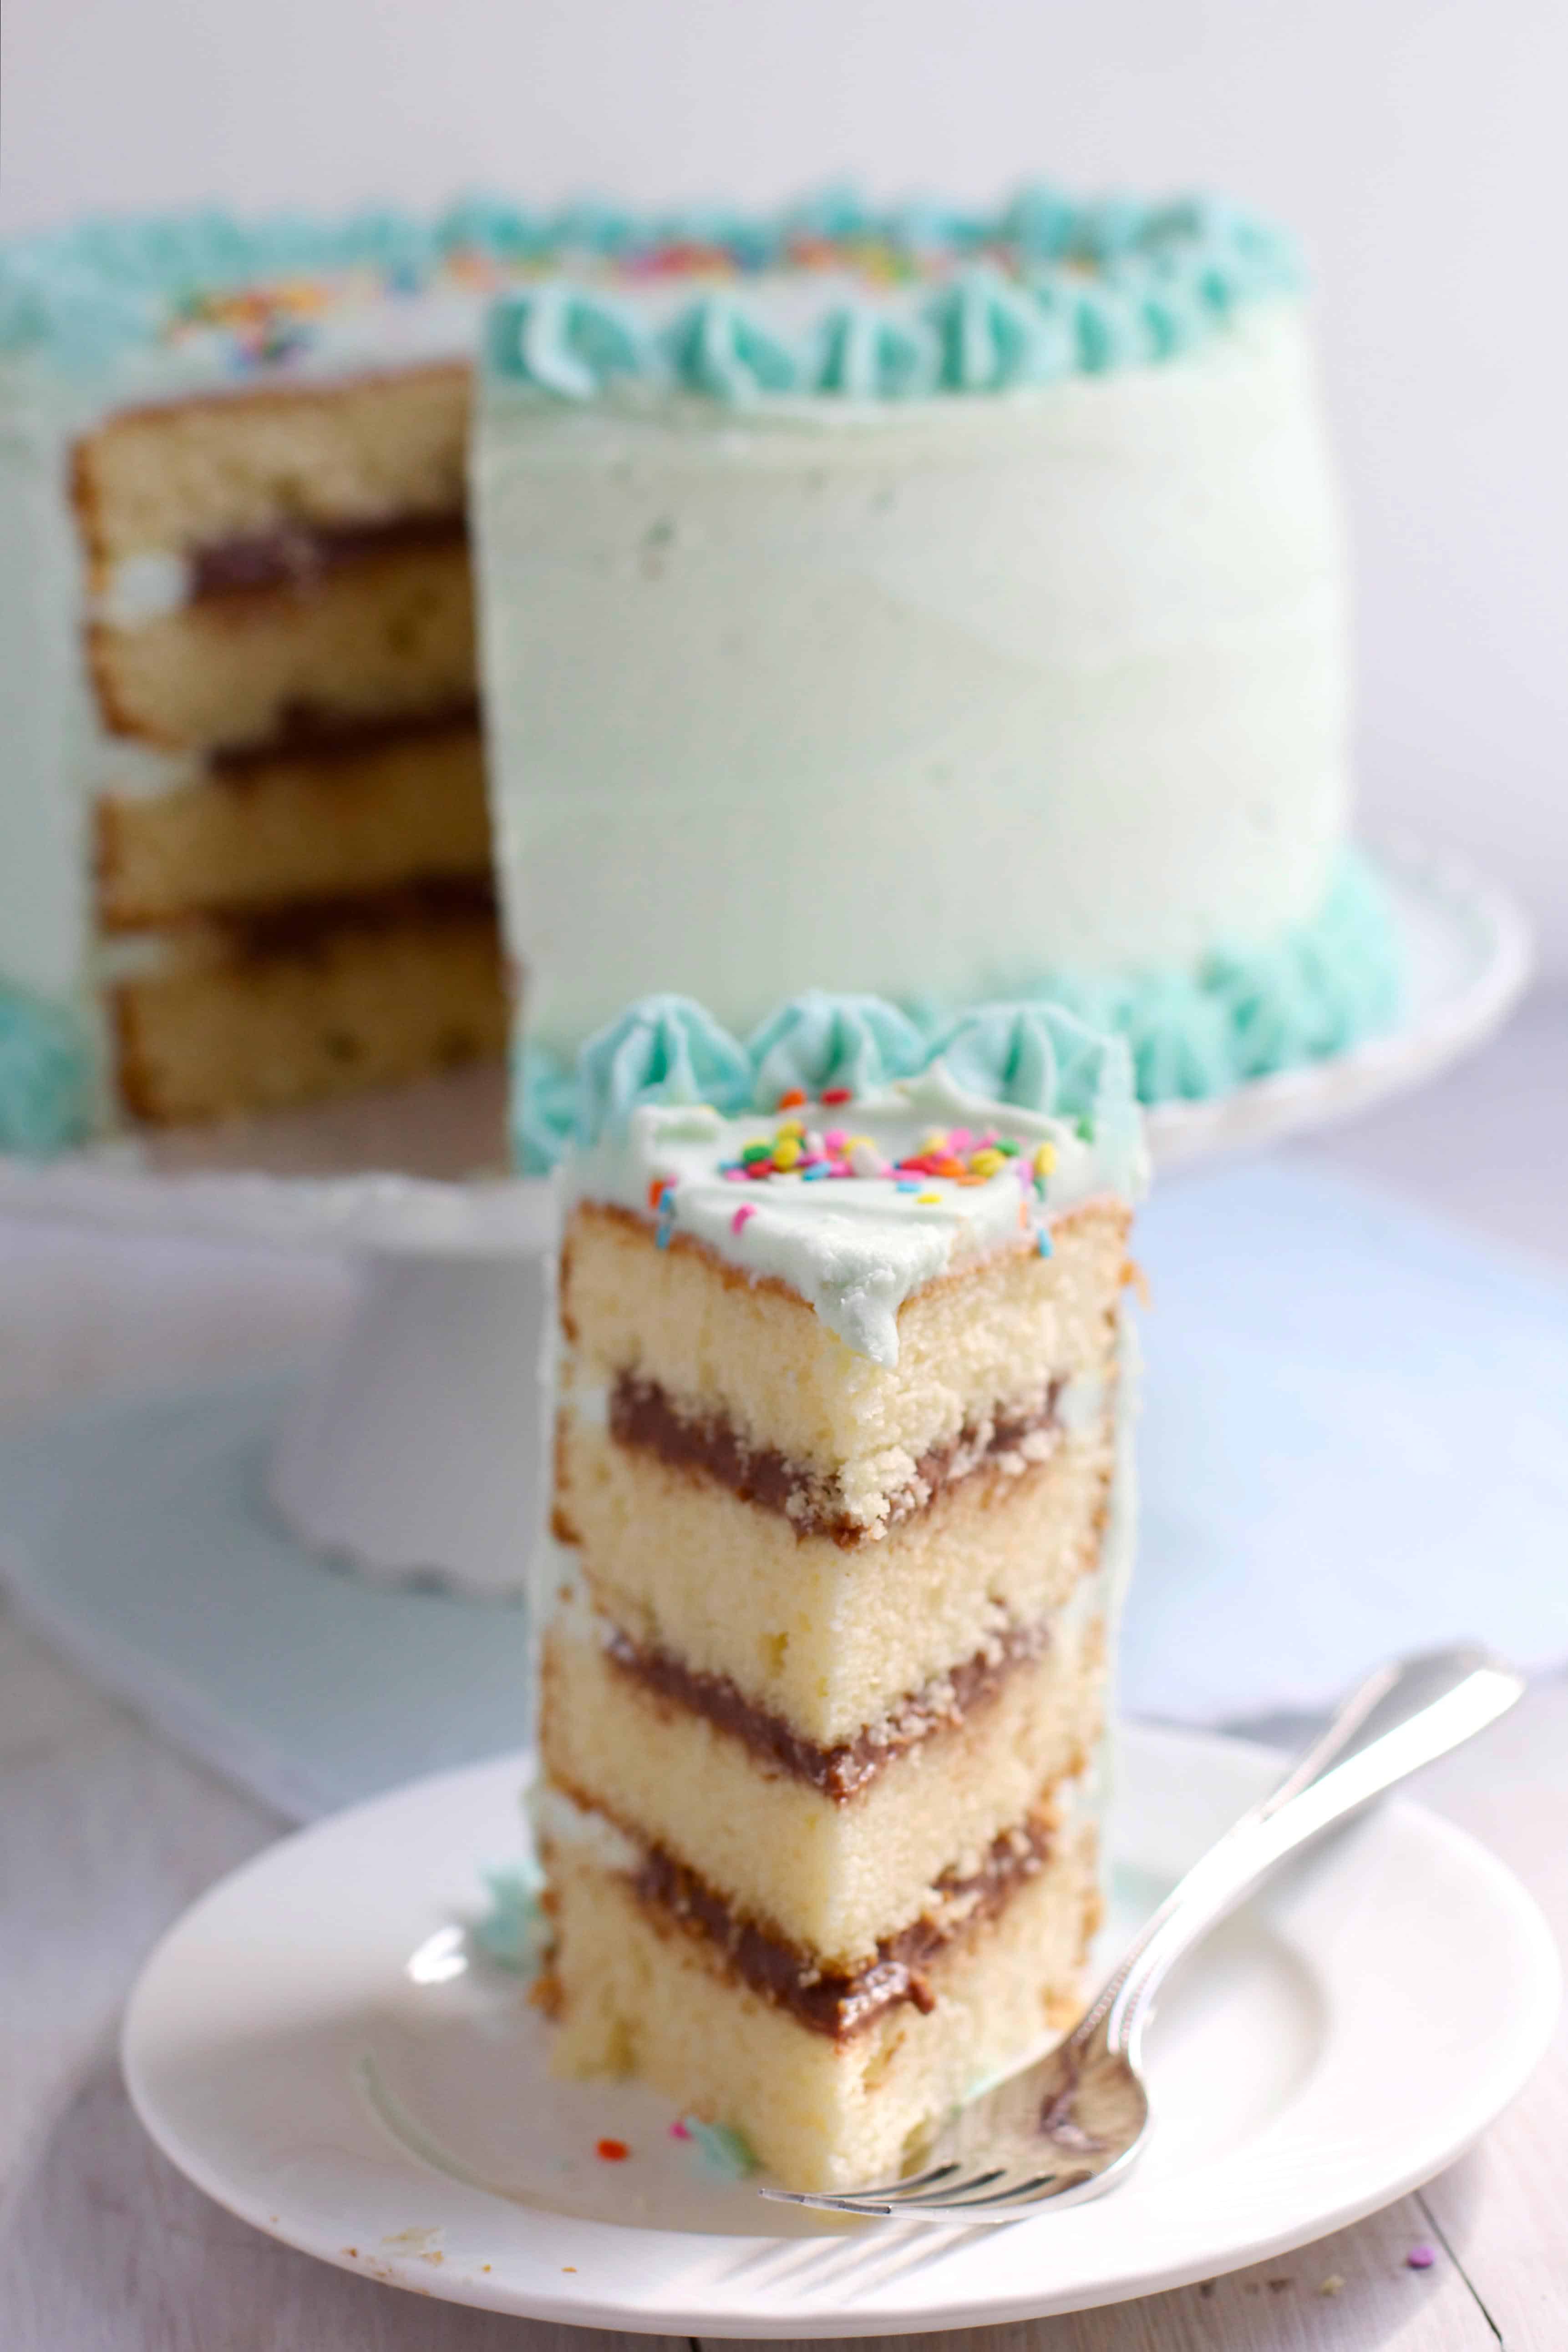
Classic Yellow Layer Cake with Fudge Filling
I am so very excited about today’s post! You may know about my ongoing goal of becoming better at making/decorating layer cakes, and with this one I think I’ve really stepped it up a notch. I’m not claiming expert status or anything, but I think if you look at some of my past attempts this is by far the best!
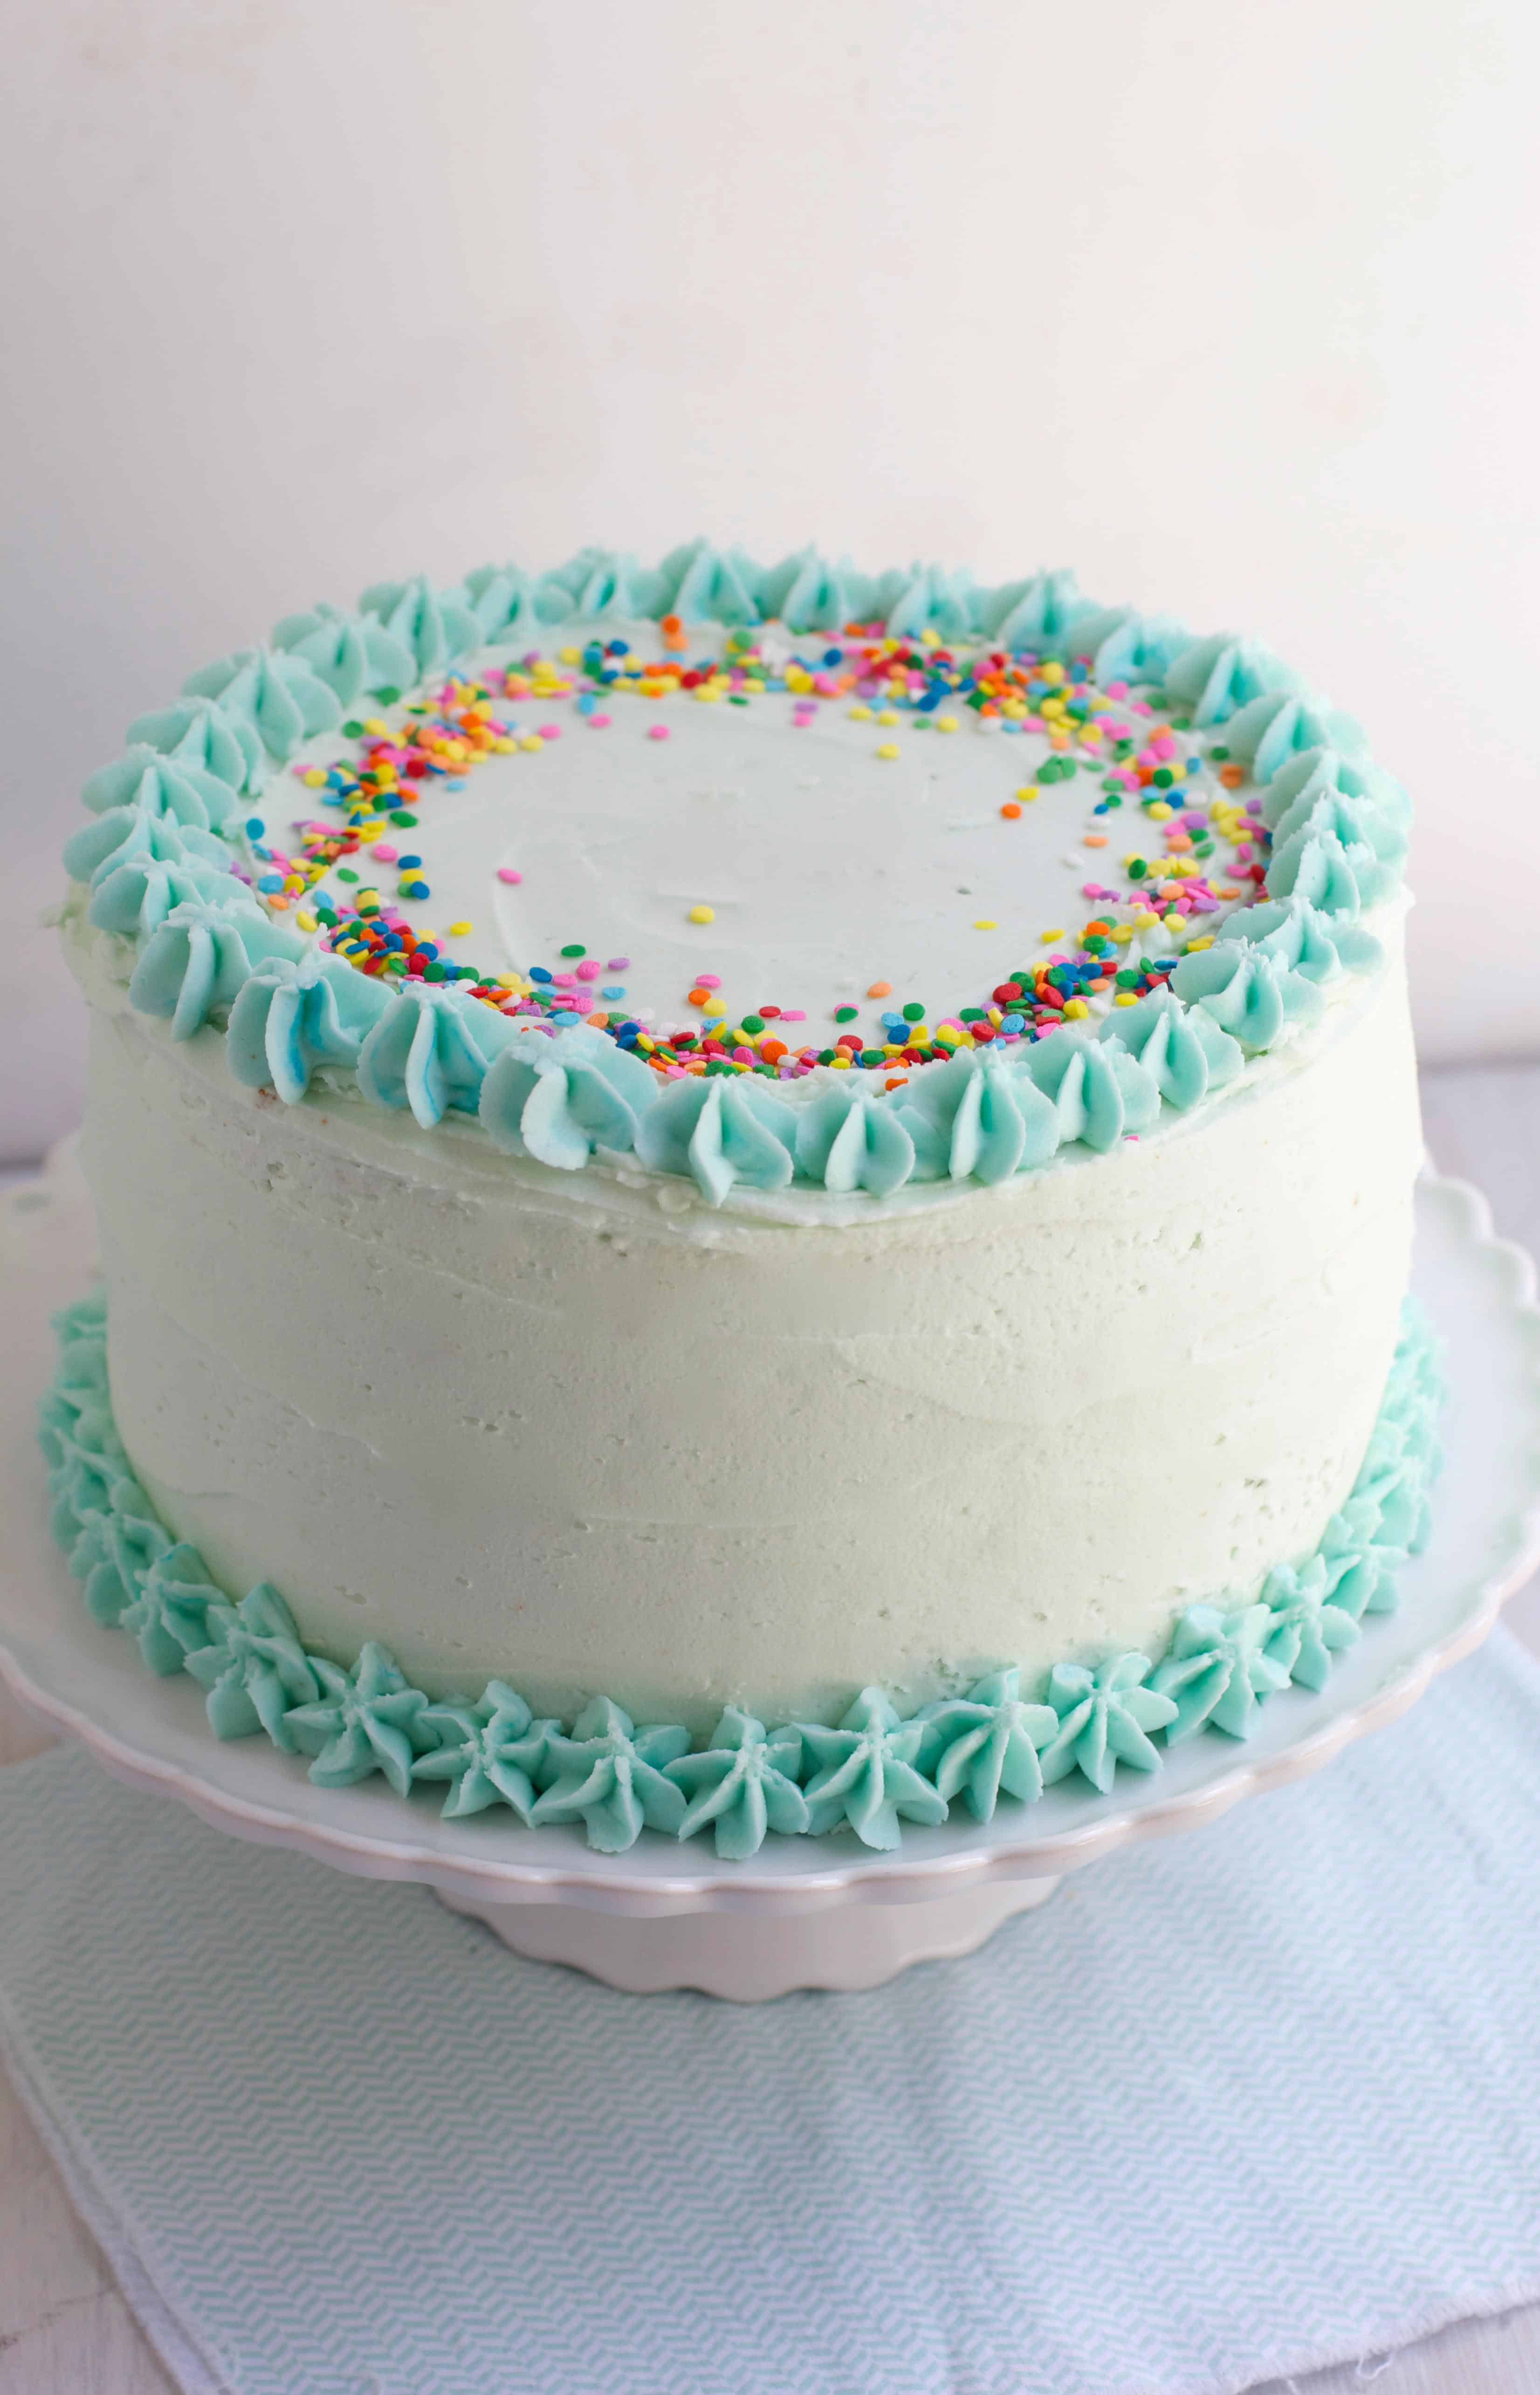
The cake I’m talking about is a lovely one- it’s a light and fluffy yellow cake with a rich fudge filling and sweet and creamy buttercream frosting. It’s a classic flavor combo and one that everyone seems to love, (judging from all the friends who got to taste this baby!) The yellow cake is a new favorite, possibly the best texture of a cake I’ve ever made- and a recipe I’m sure to keep around for awhile.
Before making this cake- I took a online class from Craftsy called “The Wilton Method: Baking Basics” that helped me so much. Are you familiar? Craftsy is a very cool site FULL of classes in so many different crafty categories. From quilting, to sewing, to pasta making and of course cake decorating- all sorts of classes are right there at your finger tips. Every single step of making this cake is covered in beautiful videos and I followed along to make sure I’ve been doing everything right.
Being a self-taught baker, I found it helpful to watch each step of the process done ya know? I’ve had a few mishaps with filling cakes and getting even layers, and the class helped with that immeasurably. Most of all- the final decorated product of my cake is pretty much exactly how they teach it in the class- and though it may not be totally perfectly smooth- it’s getting pretty darn close right? I am so excited to make more and more cakes!
I really think it’s worth the time to take the class if you want to gain better technique in layer cake making. It covers the basics like preparing your pans and baking, as well as leveling/torteing the baked cakes, frosting, and decorating. I found it so incredibly helpful. Each lesson is broken down separately so you can pick and choose which ones you want to take and when. (I watched the decorating section more than once!) The full recipe is also in there as a PDF file. Click HERE to get your Wilton Baking Basics Class to get access to the full class/recipe for this lovely cake! (The recipe is found under the “Materials” tab, under “Wilton Baking Basics.”)
This post is sponsored by Craftsy, but the thoughts opinions shared are always 100% my own.
Classic Yellow Layer Cake with Fudge Filling
Ingredients
For the Cake:
- 3 1/2 cups sifted cake flour
- 1 tablespoon baking powder
- 1 teaspoon salt
- 1 cup 2 sticks butter, softened
- 2 cups granulated sugar
- 4 eggs, room temperature
- 2 teaspoons vanilla extract
- 1 cup milk
Fudge Filling:
- 1 2/3 cups milk, divided
- 4 egg yolks
- 3 tablespoons cornstarch
- 1/2 cup granulated sugar
- Pinch of salt
- 4 tablespoons butter, cut into tablespoons
- 4 ounces semi-sweet chocolate, finely chopped
- 1 teaspoon vanilla extract
Buttercream:
- 3 sticks butter, softened
- 11/2 teaspoons vanilla extract
- 6 cups sifted confectioners' sugar
- 3 tablespoons milk or water
Instructions
For the Cake:
- Preheat oven to 350° F. Grease/flour 2 8-inch cake pans.
- In large bowl, stir together flour, baking powder and salt. Set aside.
- In another large bowl, beat butter and sugar with electric mixer until light and fluffy. Add eggs and vanilla; mix well.
- Add flour mixture alternately with milk, beating well after each addition. Continue beating 1 minute. Pour into prepared pans.
- Bake 35-40 minutes or until toothpick inserted in center comes out clean. Cool on a wire rack for 15 mins and then remove the cake from pan and cool completely.
For the Filling:
- In a large bowl, whisk 2/3 cup milk, egg yolks and cornstarch until smooth. In large saucepan, stir together remaining milk, sugar and salt until well combined. Cook over medium heat until steaming, but do not boil.
- While whisking, slowly stream about half of hot milk into egg yolk mixture to warm. Transfer back into saucepan. Continue cooking, stirring constantly, until mixture thickens and boils.
- Remove from heat and stir in butter, chocolate and vanilla extract. Cover top directly with plastic wrap and chill in refrigerator until completely cool.
For the Frosting:
- In large bowl, beat butter with electric mixer until light and fluffy. Beat in vanilla.
- Gradually add sugar, one cup at a time, beating well on medium speed. Scrape sides and bottom of bowl often. When all sugar has been mixed in, icing will appear dry.
- Gradually add milk; beat at medium speed until light and fluffy.
- Keep bowl covered with a damp cloth until ready to use.
To assemble:
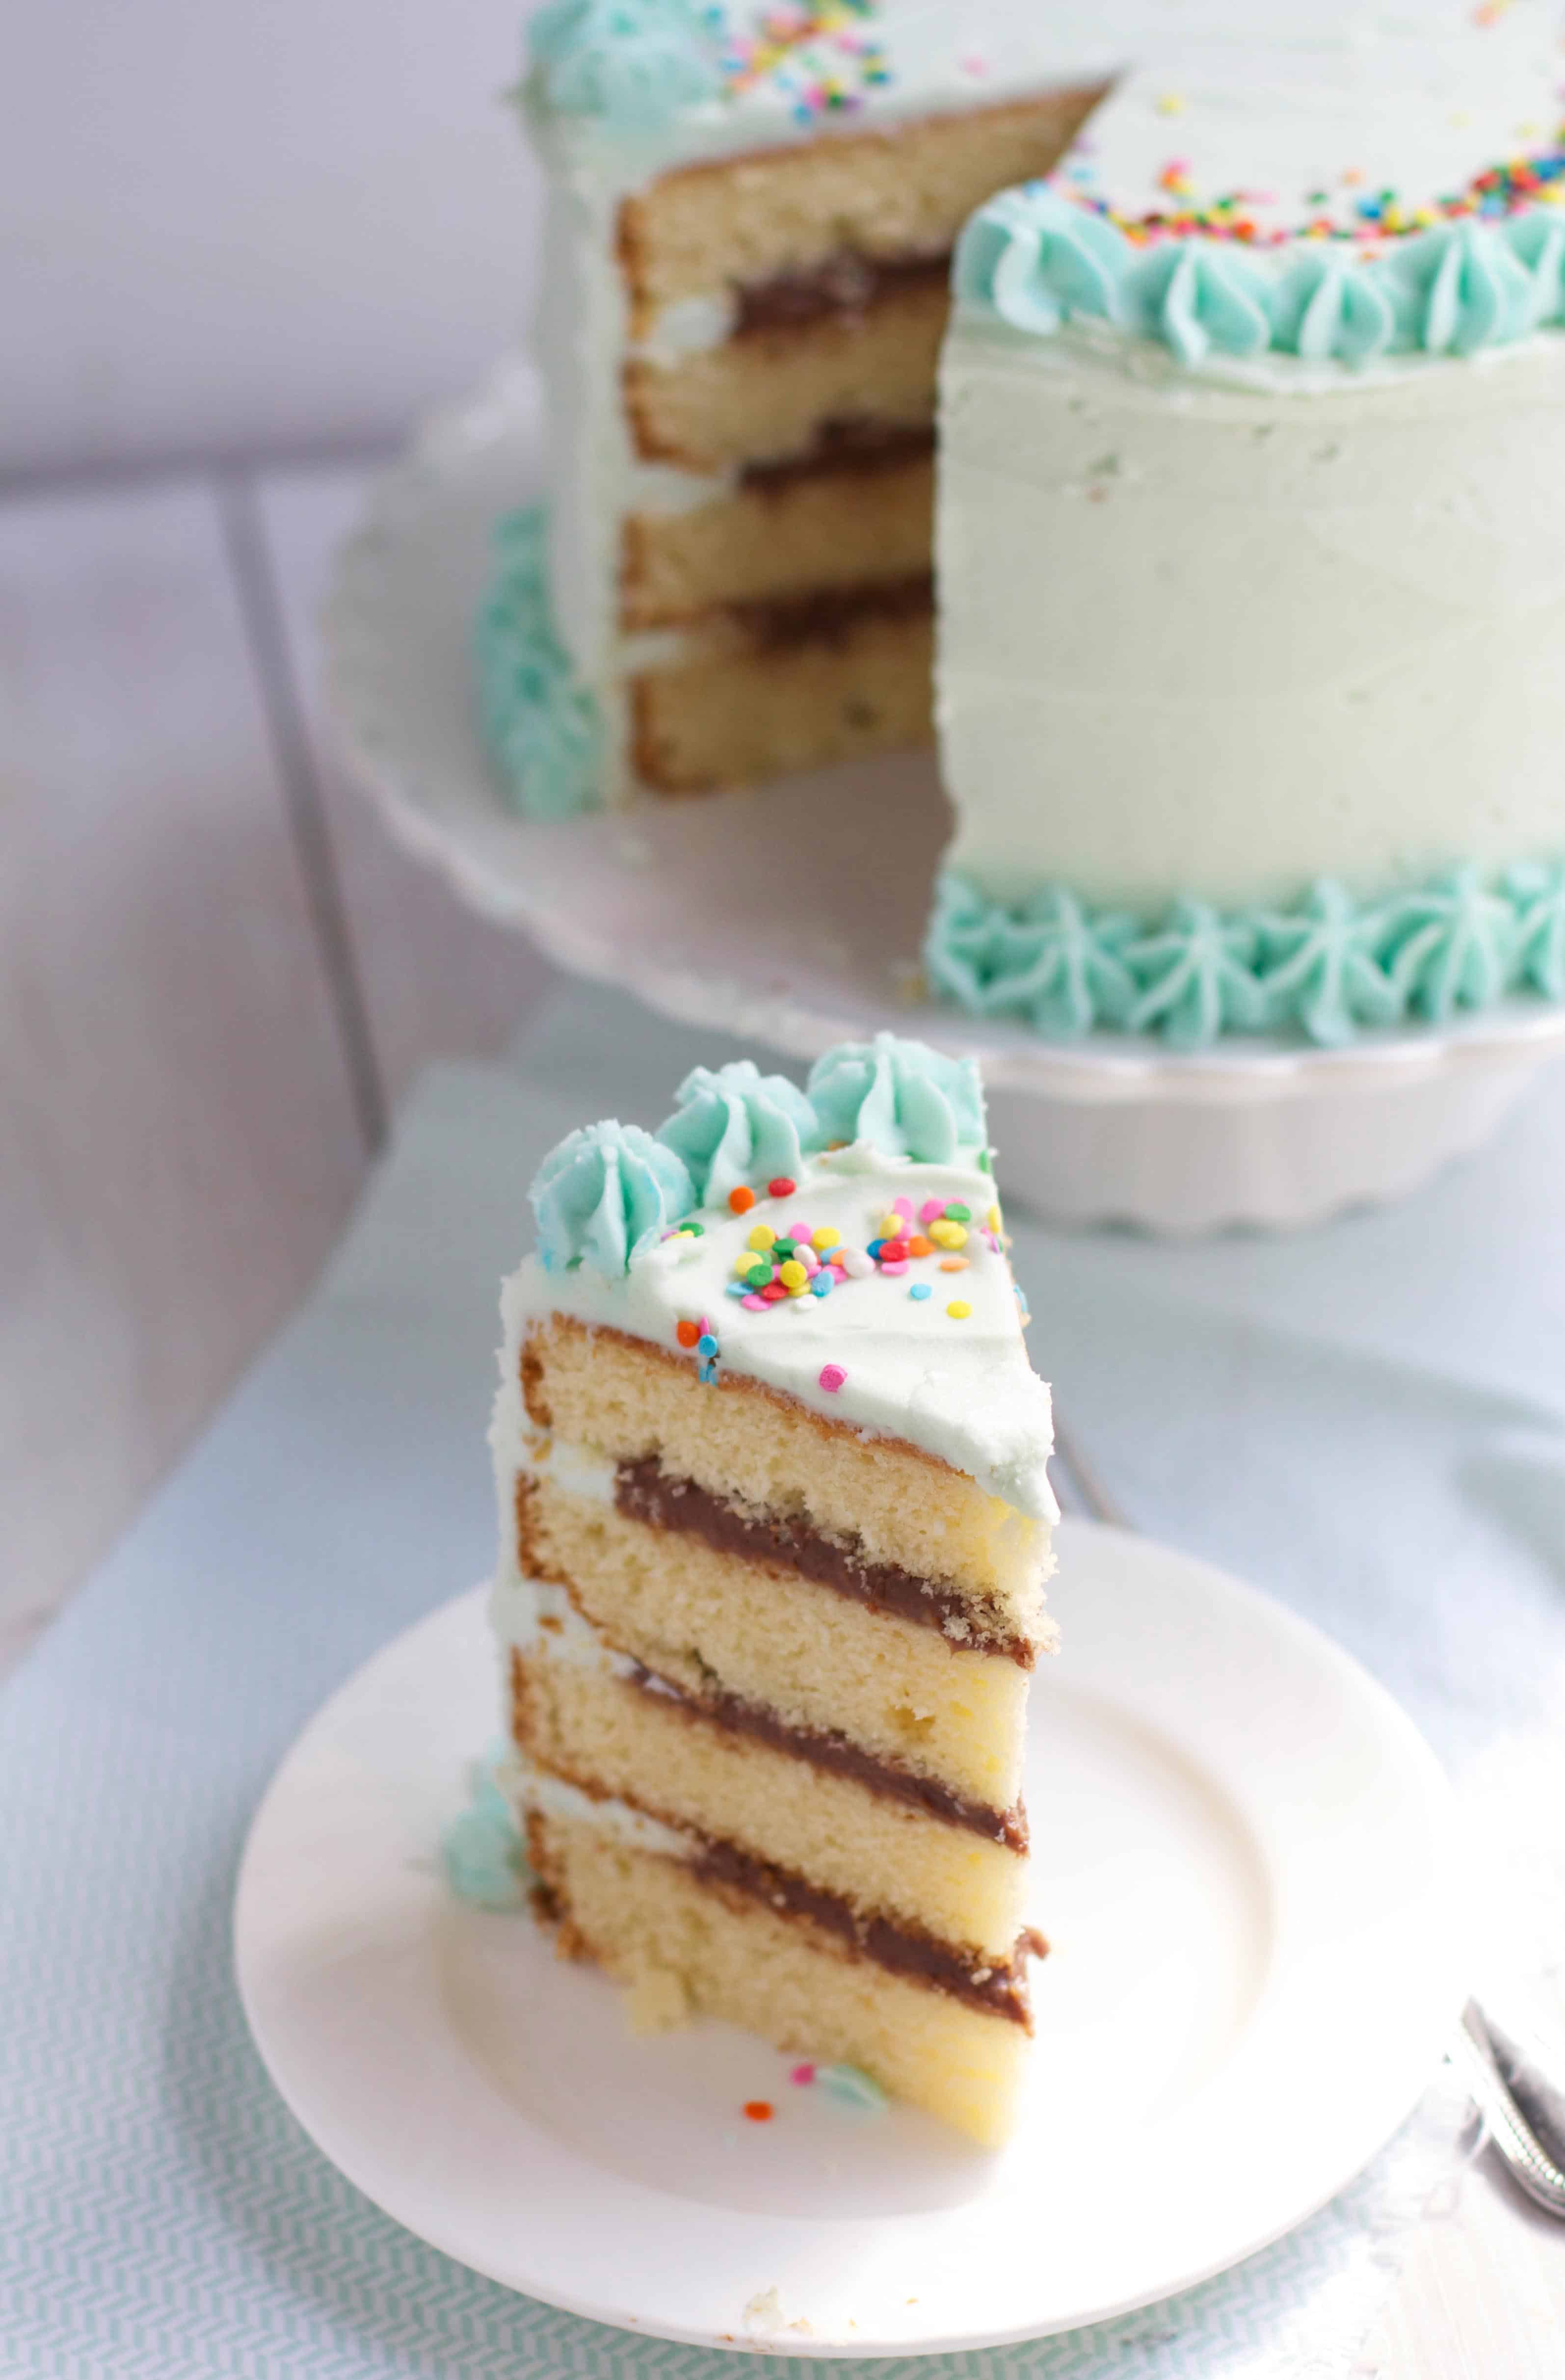
- Use a serrated knife to torte the cake, slicing each layer horizontally making 4 even layers.
- Pipe some buttercream around the edge of the first layer and then spread with fudge filling. Add another layer of cake and repeat, lining the layer with frosting and then filling with the fudge.
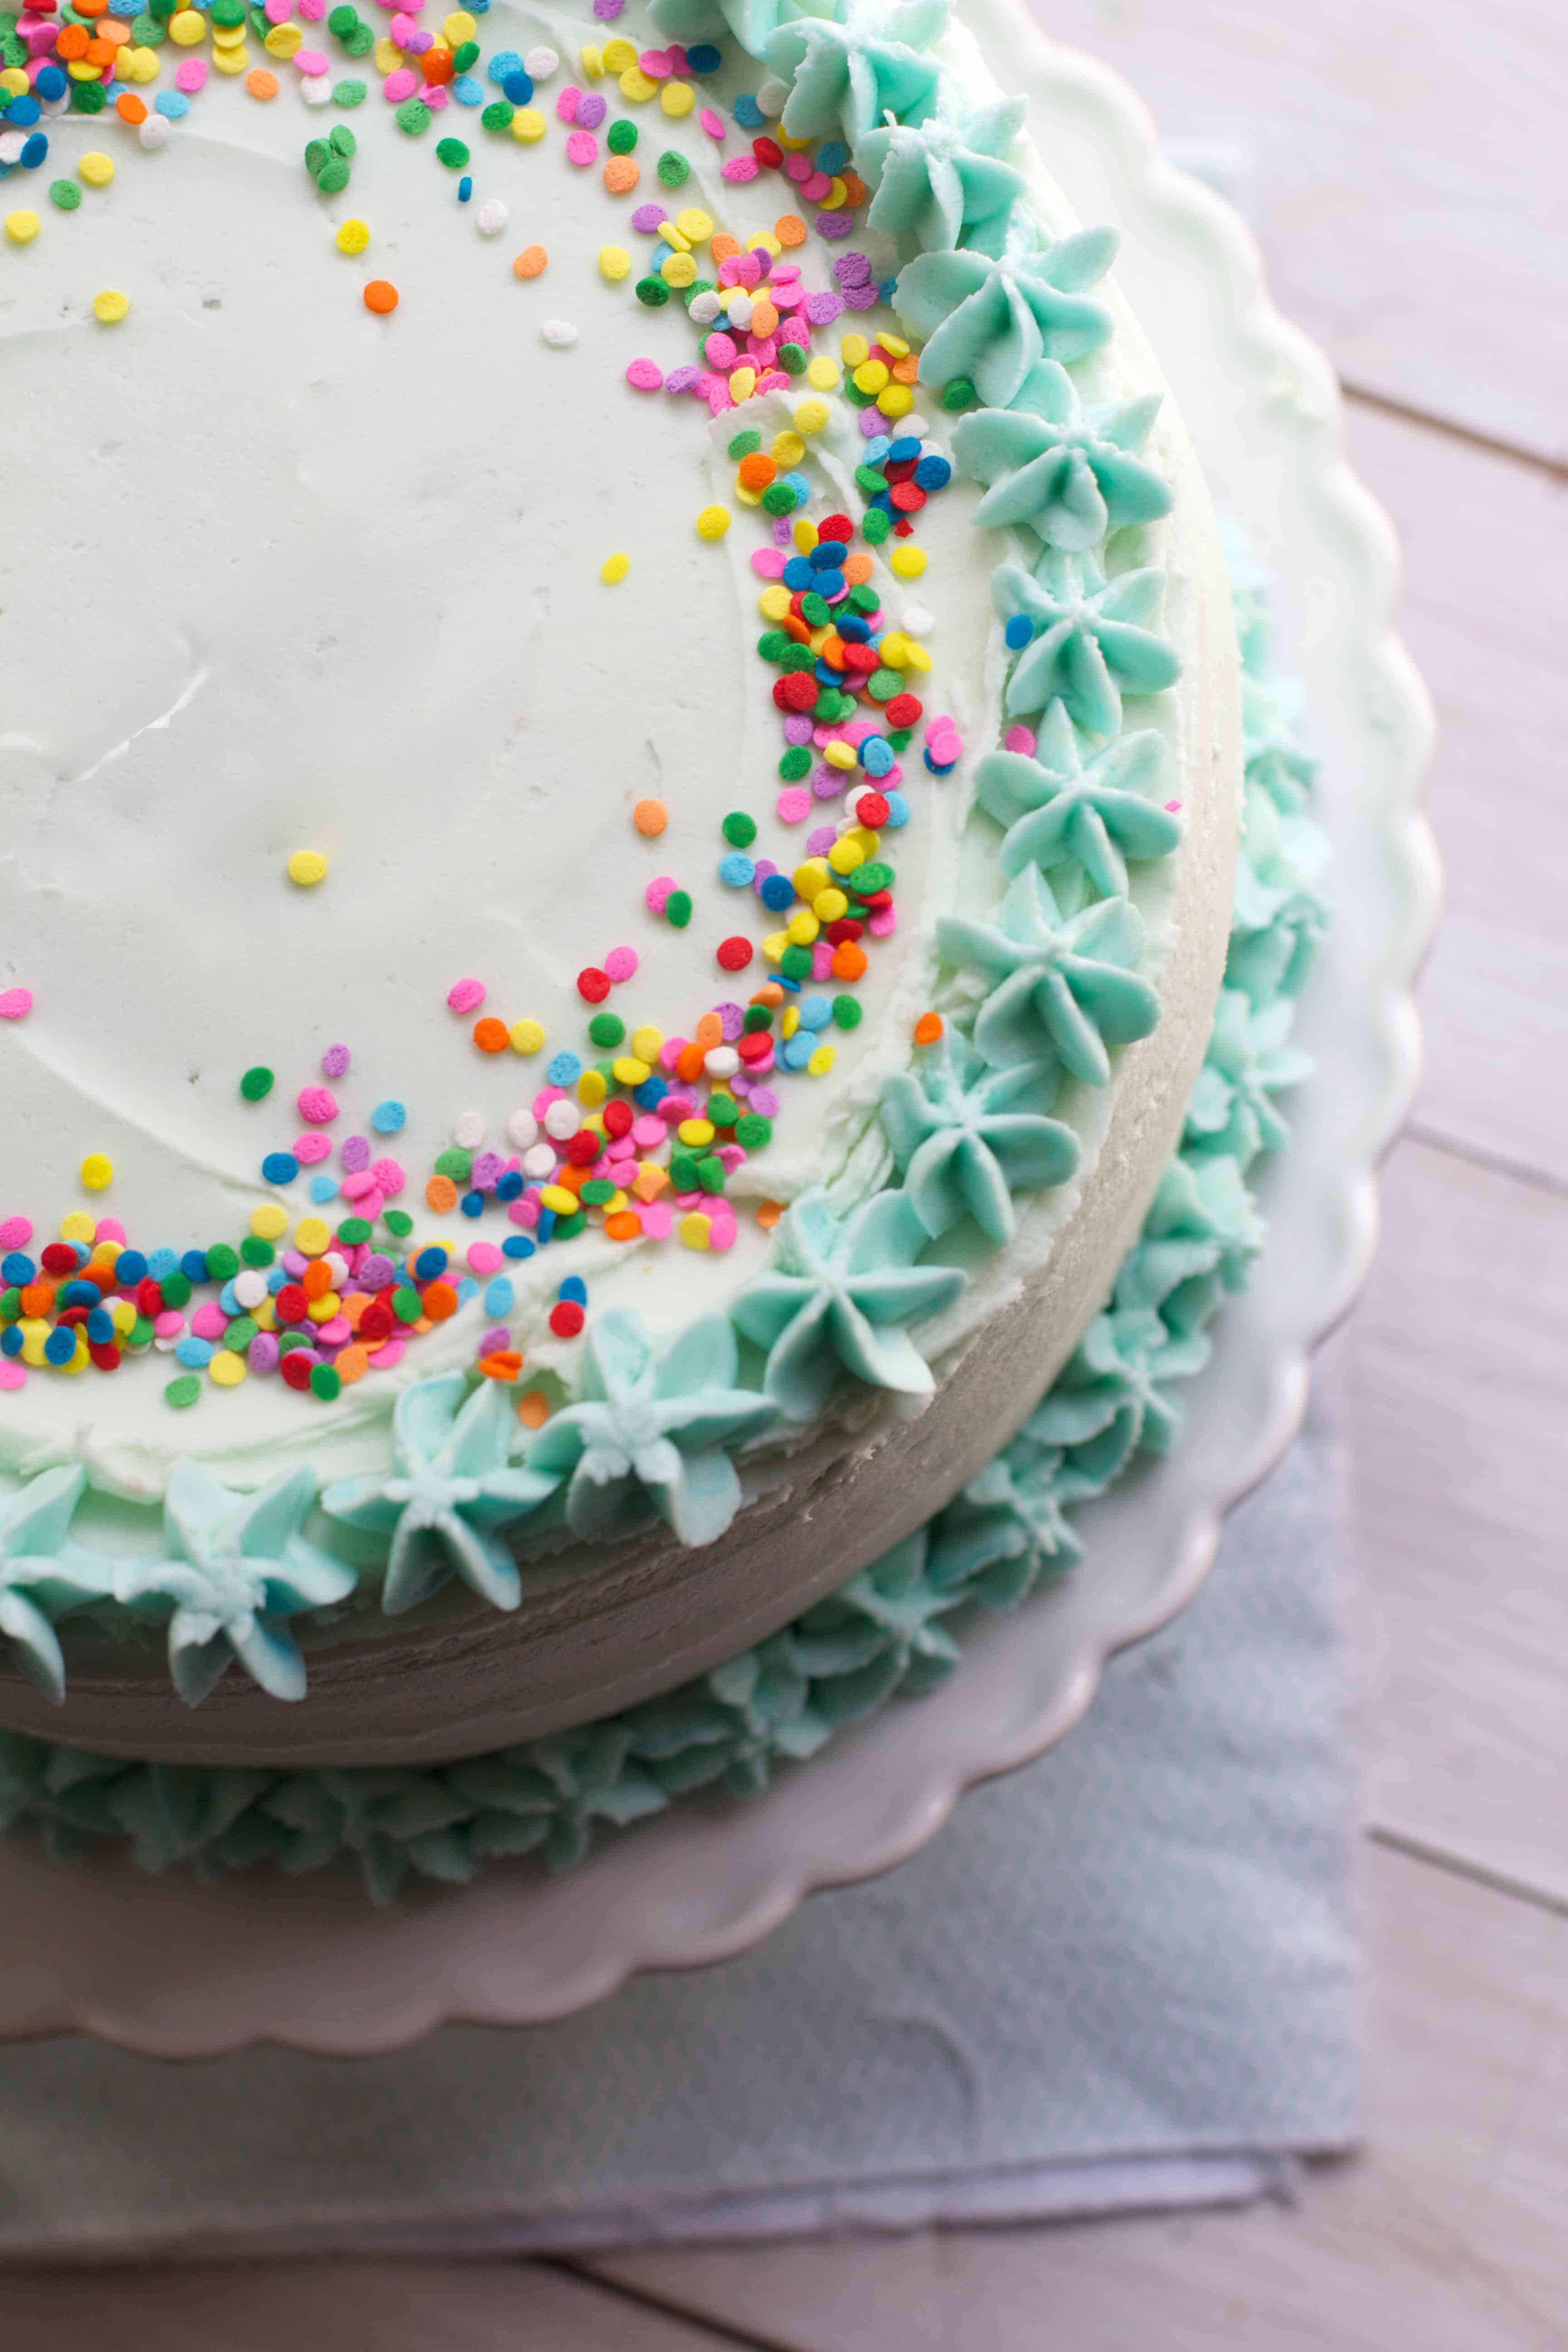
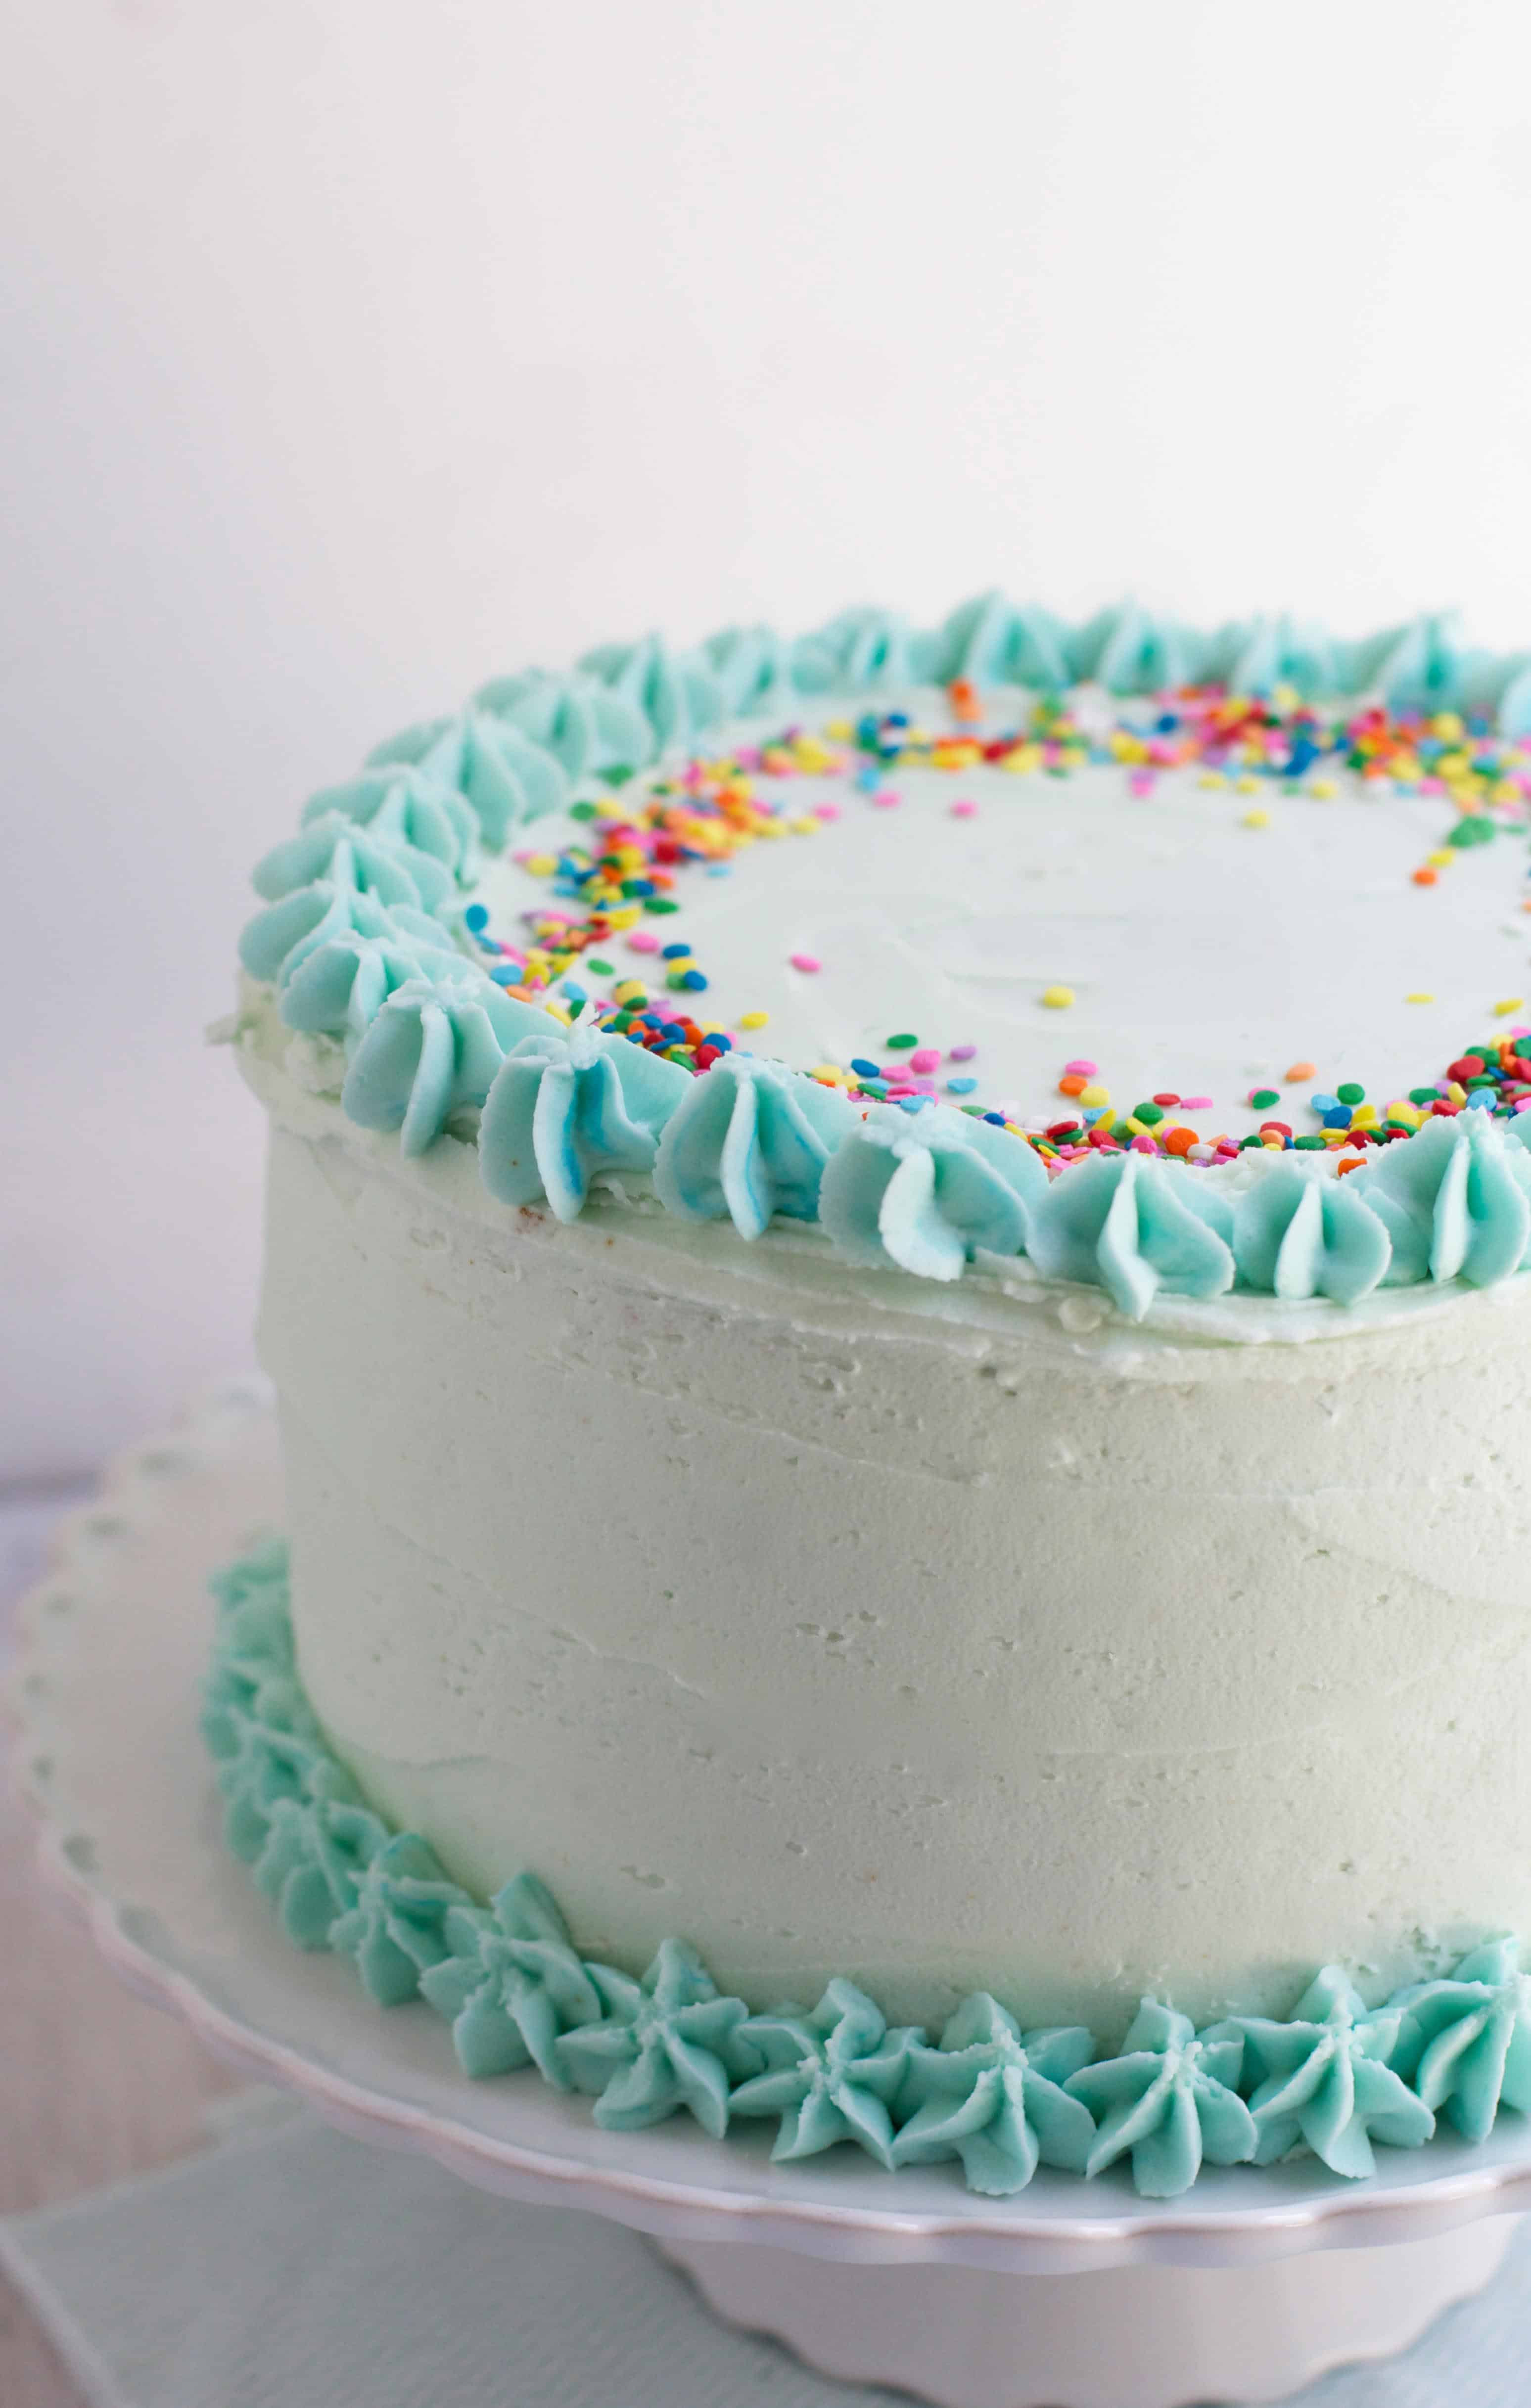
- Leave the last layer on top, with the flattest side down. Spread frosting around the top and sides of the cake. Pipe stars around the edge if desired and top with sprinkles.
Notes
Recipe from Craftsy.
Nutrition Information:
Yield: 1 Serving Size: 1 gramsAmount Per Serving: Unsaturated Fat: 0g
This cake is freaking stunning. I love that fudge filling!
This cake is seriously gorgeous, Audra! It looks professional!
This cake is so beautiful, Audra!! One of my goals for this year is to finally get around to making layer cakes. They scare me. Craftsy is definitely making me feel a little more confident and tackling cakes…can’t wait to check out their site!
Saw this on Instagram and loved how you piped the borders in blue :-)
Happy Easter!! xoxo
This is so beautiful!!! Seriously though, it looks professionally made
Wow – this cake is gorgeous!! I’m terrible at cake decorating so I’m totally looking into Craftsy.
So very pretty!
Happy 1st Easter to your baby Hugo! xo
This cake is perfect Audra! Love the videos, they are really helpful. Thanks for linking them on your blog. Happy Easter to you and the whole Fullerton fam! xoxo
Thanks Kathryn! I hope you had a wonderful Easter too!
Mama want. SO MANY SLICES
Why did I not know about this BEFORE I made that wedding cake?! Definitely the most gratifying part was getting layers even! Going to check out this class to keep making the process easier. Xoxo
This cake is practically perfect! Layer cakes are so daunting to me. I’m so afraid to commit all that time only to have it come out all lopsided. This looks perfect!
I AM IN AWE!!!! Gorgeous cake!
Your cake is so pretty! I would love a slice or ten!!
I watched all the free Craftsy cake video lessons today–they were excellent, very detailed, and definitely worth viewing. This is very helpful to me because my family has nut allergies and I usually have to bake all celebration cakes myself due to possible nut contamination in bakery and supermarket products. I plan to make this cake for my daughter’s high school graduation in May. It looks beautiful, but not overly complicated and time consuming. Thank you for the inspiration!
This cake is so pretty! I love the colors and sprinkles but most of all I love the fudge layers. So yummy! I didn’t know there were such classes online.
This cake looks magnificent! I am definitely bookmarking this post for future decorating inspiration. I really struggle in the cake decorating department.
woohoo you did an awesome job!! i write for the craftsy blog and i just LOVE their classes! i’ve learned so much, too!
Right here is the perfect blog for anybody who would like to understand this topic.
You know a whole lot its almost hard to argue with you (not that I personally
would want to…HaHa). You certainly put a fresh spin on
a topic that has been discussed for ages. Excellent stuff,
just wonderful!
So adorable! I’m sure you’ve already tried it but I’m now in love with Swiss meringue buttercream. It took my fear out of the layer cake experience. For those who find it too buttery – like I do – I found an obscure recipe mentioned that had one cup of sugar, 5 egg whites and two cubes of butter. (Using the same as typical technique.) It’s perfect – not too buttery – not too sweet, I have never seen another recipe online with that ratio. They always use twice as much butter and a little more sugar. Swiss meringue buttercream goes on the cake so easily and smoothly and pipes effortlessly – and it doesn’t crust so you can re-smooth it when needed.For those who haven’t tried it, it’s not hard like it sounds either. You just need to make sure the sugar is melted and bring the sugar and egg whites to 145 – 160°F stirring constantly. I only like to make the above mentioned amount at a time because when you whip the egg whites they don’t take as long to cool. I can make a batch in 20 min – start to finish now.
Vickie- guess what? I am posting about Swiss Meringue Buttercream tomorrow! I agree- it’s wonderful!
You said in your article that the Wilton baking basics class is for free. But I just clicked that link and I noticed that it’s not free. It says the fee is $14.99. Maybe it was free last year when you created this article. But it’s not free anymore. : (
http://www.craftsy.com/class/the-wilton-method-baking-basics/370?ext=wilton-method-baking-basics-onsite&utm_source=Big%20Partners-Wilton&utm_medium=wilton_onsite&utm_campaign=big_partners&initialPage=true
Good to know- I will fetch the recipe and add it into the post. I will write them about the class too!
Is the recipe for thos cake available? I can’t seem to locate it.
Yes have added it :)
Will you post the recipe for the fudge filling? I am making a chocolate cake with vanilla icing for my grandmother’s birthday and think that this filling might be tasty.
Yes- I will try to get that for you and update the post!
Thanks!
Probably a silly question, but is there a certain type of milk that works best?
Does this cake need to be refrigerated because of the fudge filling?
Can you freeze the fudge filling?
yes- just thaw at room temp before using
I just made this cake for a friends birthday. First time doing a 3 layer cake. It came together wonderfully. The cake was sturdy and easy to slice and work with, and the fudge filling is decadent. I frosted with chocolate buttercream and topped with a chocolate ganache. really easy to follow, excellent beginners layer cake recipe!
Thank you!