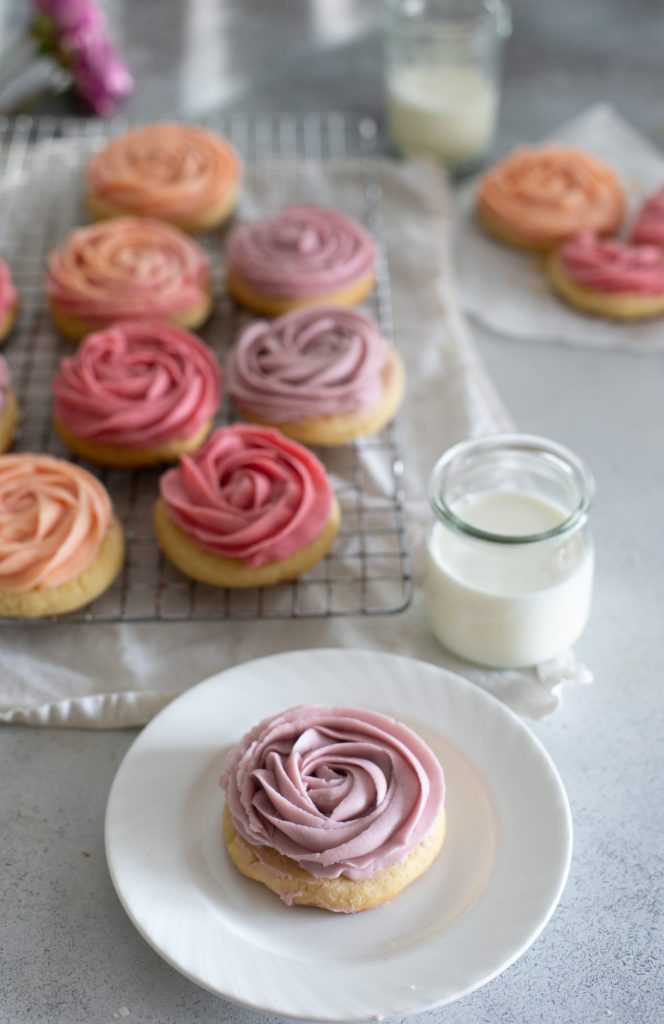
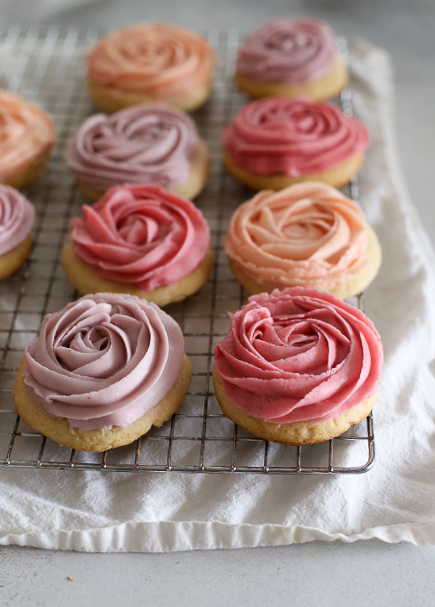
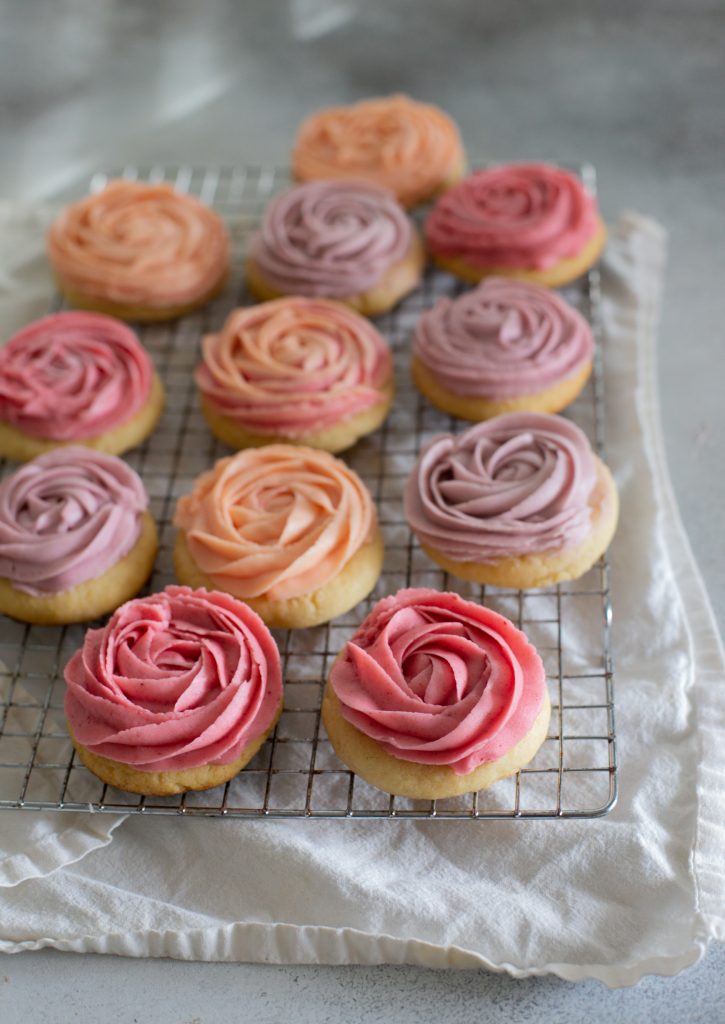
Rose Sugar Cookies

I’ve made rose cupcakes a few times before and it’s amazing how such an easy frosting technique really seems so beautiful and impressive. This soft sugar cookie is topped with sweet vanilla lemon buttercream that adds an extra brightness to the not-too-sweet cookie base. These are a beautiful and special treat for Valentine’s Day, a bridal shower, Mother’s Day, or any event where you want to show off gorgeous rose sugar cookies!
Ingredients needed for Rose Sugar Cookies:
- Unsalted butter at room temperature
- All purpose flour
- Confectioners’ sugar
- Eggs
- Vanilla extract
- White sugar
- Lemon Juice for frosting (you could also sub almond extract!)
Supplies needed for Rose Cookies:
- Cookie sheets
- Wire rack
- Parchment paper
- Pastry Bags
- Large star tip for frosting
- Large bowl
- Electric Mixer
How to make Rose Sugar Cookies:
Start by combining dry ingredients in a medium bowl and set aside. In a large mixing bowl cream the butter and sugar on medium speed. Add the vanilla extract and eggs and mix until smooth and creamy. Slowly add it in the flour mixture and mix on low speed until just combined. Scoop cookie dough onto a prepared baking sheet and bake cookies for 10-12 minutes.
For the frosting: Cream together the butter and powdered sugar on high speed and then add lemon juice and milk or cream as needed until a fluffy and creamy frosting is achieved. Color frosting as desire with freeze dried fruit powder or food coloring and fill into a piping bag fitted with large tips. Follow this Rasbperry Buttercream recipe for beautiful pink shades.
How to make a rose from icing:
I promise it is easy as can be. I recently taught my mom who was convinced that I had some fancy cake decorating training up my sleeve. (I really don’t.) Let me break it down for you.
- Fit a frosting bag with a large, star tip. (I use either Ateco #844 or Wilton #1M)
- 2- Fill your bag with frosting- leave a good three inches empty on the top so it doesn’t ooze out as you’re frosting the cookies.
- 3- Hold a cookie with one hand and the frosting bag with the other. Start in the center of the cookie- and pipe in a circular motion counter clockwise. (I think for these cookies I went around 3 times.)
- 4- That’s it! Seriously so easy.
How do I color this frosting with all natural food coloring?
I don’t love food coloring for my kids so I am always looking alternatives. For these I used a combo of freeze dried raspberries for the pink frosting, (I actually got this raspberry powder which makes it so much easier and lasts forever.) For the lavender and peach I bought this natural food coloring and used 2 drops of red and 2 of blue for the lavender and 2 red and 2 yellow for the peach!
Other recipes using freeze dried fruit in the frosting:
You may also like:
This post contains affiliate links

Pastel “Rose” Sugar Cookies
Ingredients
- 4½ cups all-purpose flour (563 g. )
- 4½ tsp. baking powder (20 g.)
- ¾ tsp. salt
- 1½ cups 3 sticks unsalted butter, at room temperature (12 oz.)
- 1½ cups sugar (200g)
- 3 large eggs
- 5 tsp. vanilla extract
For Frosting:
- 2 sticks unsalted butter, room temperature (8 oz)
- 3-4 cups powdered sugar (375-448g)
- 1 teaspoon vanilla extract
- 1 teaspoon lemon extract, or 2 tsp lemon juice
- milk or cream as needed.
Instructions
- To make the cookies, preheat the oven to 350 F. Line baking sheets with parchment paper or silicone baking mats. Set aside.
- In a medium bowl combine the flour, baking powder and salt, and whisk together to blend.
- In the bowl of an electric mixer, combine the butter and sugar and beat together on medium-high speed until soft and fluffy, about 2-3 minutes. Beat in the eggs one at a time, mixing well after each addition and scraping down the bowl as needed. Blend in the vanilla. With the mixer on low speed, add in the dry ingredients mixing just until incorporated and evenly mixed. Cover and chill the dough for 1 hour.
- When you are ready to bake the cookies, scoop a scant quarter cup of dough and roll into a ball. Flatten the ball slightly and place on the prepared baking sheet.
- Repeat with the remaining dough, spacing the cookies at least 2-3 inches apart. Bake about 10-12 minutes or just until set. (Don't over bake- the cookies will be very pale and the edges will only be slightly golden if at all.)
- Let cool on the baking sheet for several minutes. Transfer to a wire rack to cool completely.
For Frosting:
- In a medium sized bowl, whip the butter with an electric mixer until creamy and fluffy. Gradually add 3 cups of the powdered sugar, one cup at a time and mix until thick and well-combined. Add the vanilla and a tablespoon of milk or cream, and mix on medium high until fluffy. If you want to thin your frosting out a bit- add more milk, OR- add more sugar if you want it to be stiffer.
Nutrition Information:
Yield: 2 Serving Size: 1 gramsAmount Per Serving: Unsaturated Fat: 0g
These are perfect! I want a bouquet of them!
Aww these are super cute. Spring is definitely not my favorite season (I’m more of a Fall and Winter girl) but I do adore all the pastel colors that pop out this time of year :)
This is one of the first frosting techniques I learned and I still love it. I thought for sure it was harder than it sounded but I nailed on the first try. Such beautiful cookies!
absolutely beautiful! I’m in love with springtime!!!
These are just darling! Love them. Yay for warmer weather.
I love the rose technique!
Gorgeous! Almost too pretty to eat! I would love to see a video because I suck at frosting!
What a fun idea for the frosting on these cookies Audra, they’re gorgeous! I remember thinking this technique would be difficult but it really is super easy :)
Beyond gorgeous and perfect for Easter! Hope you’re having a fabulous time!
These are so pretty!
These are awesome! I am making desserts for my friends’ wedding social and these will be a perfect addition!
tiny eggs over cupcakes, roses over cookies…you have some of the cutest stuff here!
i bought the course 1 wilton decorating kit last year, still haven’t gathered the confidence to open and use it … :-/
Wow I never realised making roses was so easy!
Definitely trying this out soon.
Thanks so much :) x
Haven’t tried it yetm but love the way they look. Did you really use a star tip? I thought when I first looked at them you’d use a flat edge tip like when you make roses that stand up? Just wondering. Thanks for a great idea.
Hey lady- sorry for the delayed reply. Yup! Large star tip is all you need! It looks way more difficult than it is! xo
Thank you!
Can’t wait to try them out :)
Hello to all, because I am really eager of reading this website’s post to be updated on a regular basis. It includes pleasant data.
Thanks for the great idea! I did just as you said and they turned out well. I did 3 pastel colors on 1-1/4 in. brownie bites (circles) for a volunteer event. Very pretty. Next time, I might try a little smaller tip.
I just wanted to say thank you thank you thank you! I am a petty decent baker, but I have never gotten the hang of decorating. I just do not have an artistic bent, and it is a real struggle to even cut bar cookies in even sizes. I made a pan of sugar cookie bars, but instead of cutting them as bars, I cut them into rounds with a cookie cutter. I then used your rose decorating trick. I have to say, I did not think I would be able to do it. I thought it HAD to be harder than you made it sound. Gratefully, I was wrong! It was SO easy! I used four different colors of pastel buttercream, and when I was done, I had a garden of beautiful roses. They would be perfect for a baby shower or bridal shower. Thank you so much for sharing this! One question: I notice that the outside ring on the roses is a bit… I guess you would say looser?… than mine turned out. It made your roses look more fully in bloom than mine did. Do you know why that might be? (I know I am not describing it very well.) Oh, and congrats on your pregnancy! I have struggled with infertility for years and turn 36 next month, so cross your fingers for me that some day soon I might be so lucky.
Hi! These are absolutely beautiful, but I do have a question! What kind of consistency is the frosting when it dries? Does it dry hard enough to pack cookies in a box, one on top of the other, or does it remain a more buttercream-y consistency? I want to be able to gift these, but am not sure what the frosting will behave like! Thank you!!!
It’s not rock hard enough for stacking but it does have a hard-ish surface. I’d suggest laying them flat in a box to transport! :)
Beautiful and so easy! Love it!
Gorgeous. And you make it sound so easy! These would be perfect for any spring event! We featured your recipe in our Feature Friday last week for 20 ‘Egg’stra Special Easter Desserts!
I wonder how much is 1 stick of butter? In gram or oz, thank you!
1 stick is 4 oz
excited to try this out! but there’s nothing about the pastel coloring here that I can find! :\
The information is in the notes above the recipe.
Do you have the recipe in weight vs volume? Weight generally is more accurate…thank you!! The mac recipe is next on my list. ;)
everything except how to put the frosting on,,,,,disappointing
Would this work with margarine in place of butter if need to make a dairy free version?
Can these be used as cookie cutter cookies since they don’t spread or rise? These have already been my “go to” recipe on Pinterest ever since I found it years ago, and I need a cookie cutter recipe but don’t want to use a roll out one and was hoping this one would work. What’s your thought on it?
Hi, beautiful cookies! I’m doing a cookie table for my son’s wedding and these would be perfect. Can you tell me if I could freeze them for a couple weeks?
The cookies- yes! But I wouldn’t frost them first
Hi….making these for my niece’s wedding shower. How far in advance can I frost? Thanks! They are beautiful!
Hi! I think you could frost them a full 24 hours before and just cover them in an airtight container or plastic wrap over a sheet pan!
Thank you for showing the video on how to add the frosting. Mine came out beautifully! The sugar cookies were so delicious and gone in a flash!
I made these for a baby shower and they were a big hit. Thanks for the easy recipe.
Thank you!
One way to tint the frosting is with a teaspoon or two of fruit jams or jellies. Grape jelly is a beautiful lavender, berry jellies more pink. I think jams would need to be pressed through cheesecloth or a sieve screen to pull the seeds, if you are using a piping tip, but to just frost cupcakes it works fine. Easily available, and natural fruits.
Yes jams work but they still change the texture of the icing a bit. Freezed dried fruit is a game changer- you can add so much flavor without messing with the texture :)
Danke für die tollen Kekse und danke auch für die Gramm Angaben!!!
Viele Grüße,
Gabriel